Lofoten Revealed: How to Shoot Without the Crowds — Insider Guide
By Jan Smid, Master QEP · ZEISS Ambassador · 25 Lofoten expeditions since 2016
📍 Updated April 2026 · Based on real field experience across every season · Interactive Map: Famous Lofoten Photography Locations
The Lofoten Islands are no longer the "secret" they once were. In 2026, capturing the best photography locations in Lofoten requires more than just a GPS and a tripod—it requires a professional strategy.
As a Master QEP photographer with over 25 photo expeditions to this Arctic archipelago, I’ve seen the landscape transform first-hand. From the iconic red cabins of Reine to the turquoise "Caribbean" waters of Haukland, the famous classics are more crowded than ever. That is why I’ve created this ultimate insider guide.
Whether you are chasing the golden Midnight Sun during the endless summer days or hunting the Aurora Borealis across the winter sky, this is your field-tested blueprint. My goal is simple: to show you how to master Lofoten photography by hitting the iconic spots at the right time, while revealing the hidden gems that most tourists drive right past.
This isn't just another travel blog. This is a veteran’s perspective on how to bring home world-class images from the best photo spots in Lofoten without a hundred other tripods in your frame. Let’s get into the details.
If you want to see how these images actually come to life in the field, my YouTube channel covers the full behind-the-scenes workflow — from scouting and composition to the final edit. My complete Lofoten gallery shows the results across both seasons.
Everything in this guide was photographed on location during real expeditions. No stock images. No studio setups. Just Arctic light and field experience.
At the end of this guide you will find an interactive map of the most well-known Lofoten photography locations — a solid base for planning your route. One note of honesty: the map shows the locations that appear in guides and on social media. The spots that have produced some of my strongest images over 25 expeditions are not on it — those I share only in the field, with expedition participants.
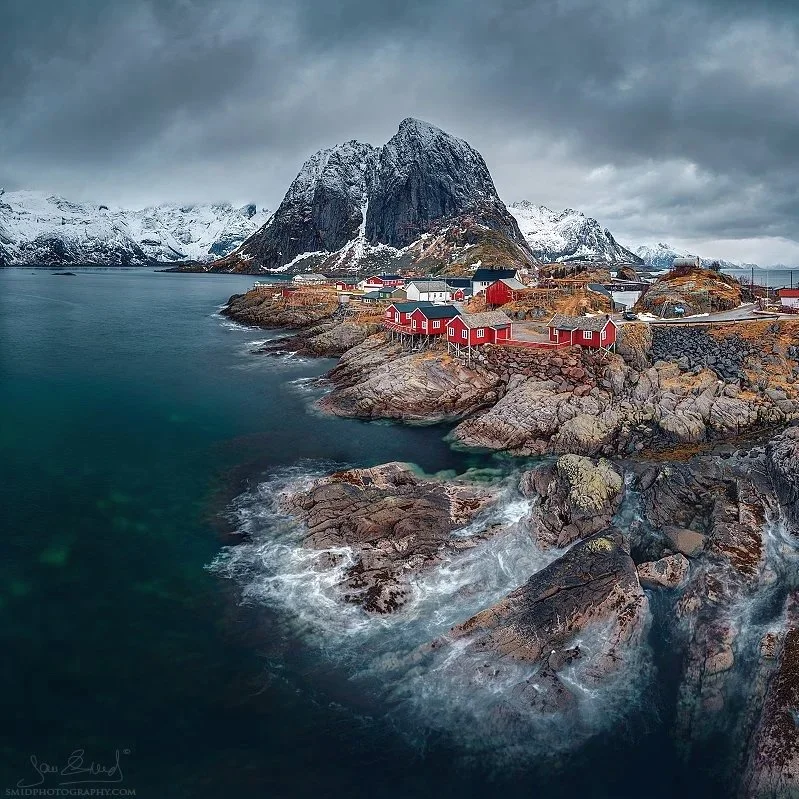
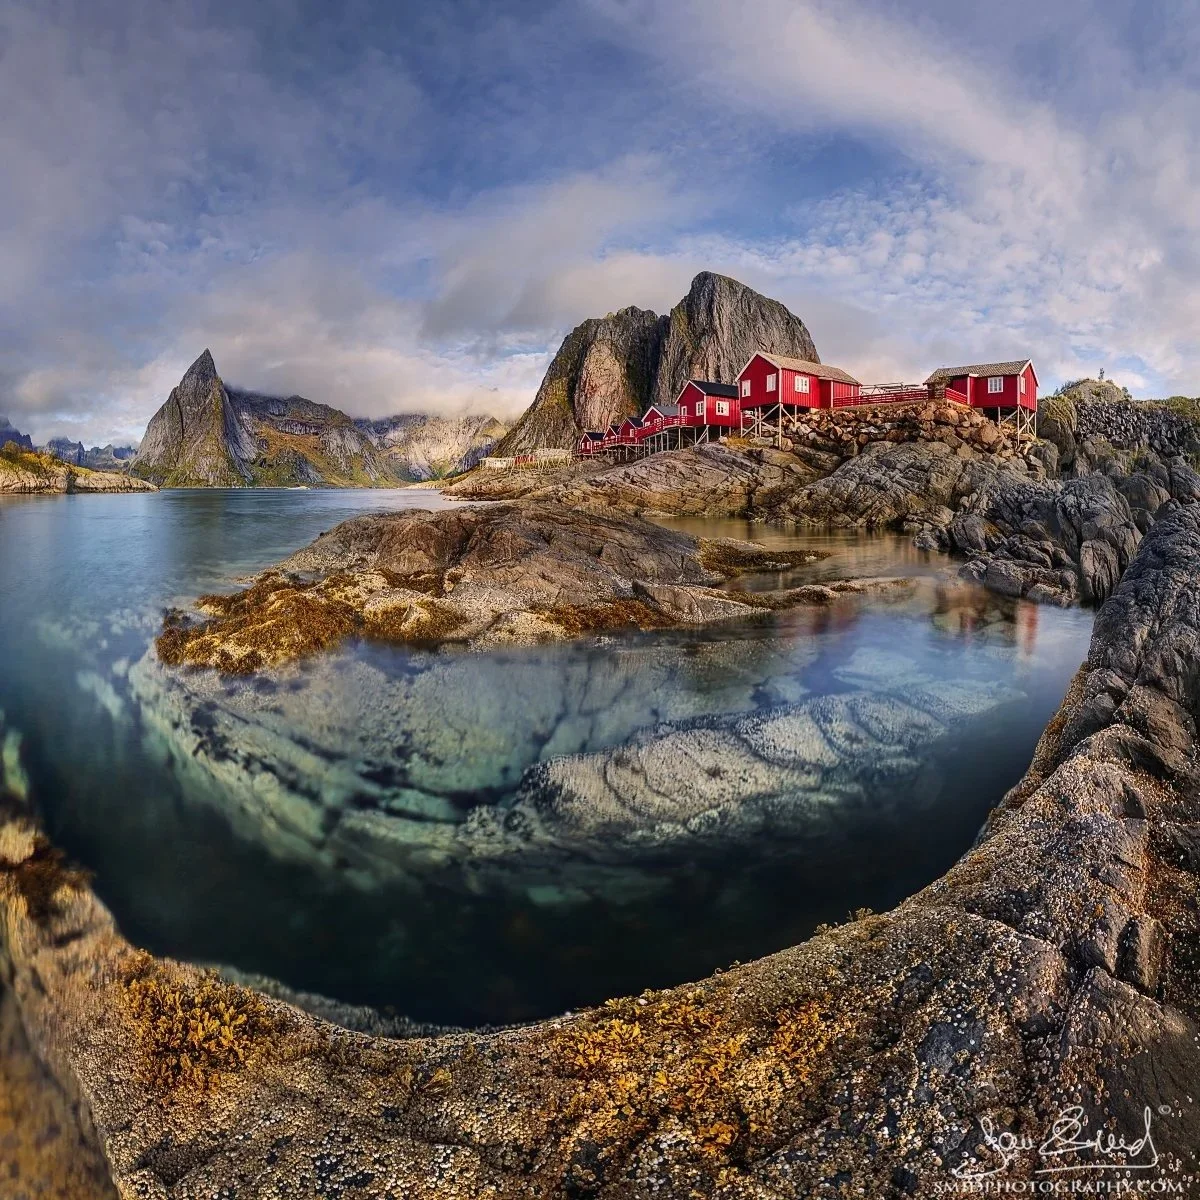
Reine and Hamnøy
Reine is the most photographed village in Lofoten, and Hamnøy with its iconic red rorbuer under granite peaks is the image most people picture when they think of Norway. They are famous for a reason. They also require more thought than most photographers give them.
The classic Hamnøy shot is taken from the bridge connecting the islands. What most guides don't tell you: you need a tall tripod. The railing is high, and shooting over it with a low tripod produces a compromised composition every time. Bring a tripod that gets your camera to at least 150 cm.
Tide matters enormously here. At high tide, waves break against the rocks below the bridge and add drama and movement to long exposures. At low tide the rocks sit dry and the foreground loses its energy. Check the tide tables before you plan your shoot — this single variable changes the image completely.
The best light: pre-dawn blue hour, sunrise, or post-sunset blue hour. Midday light flattens everything.
A detail most photographers miss: at low tide you can walk under the bridge and photograph from below, looking up at the structure with the peaks behind. It is a completely different image and almost nobody takes it. Get your feet wet if necessary — it is worth it.
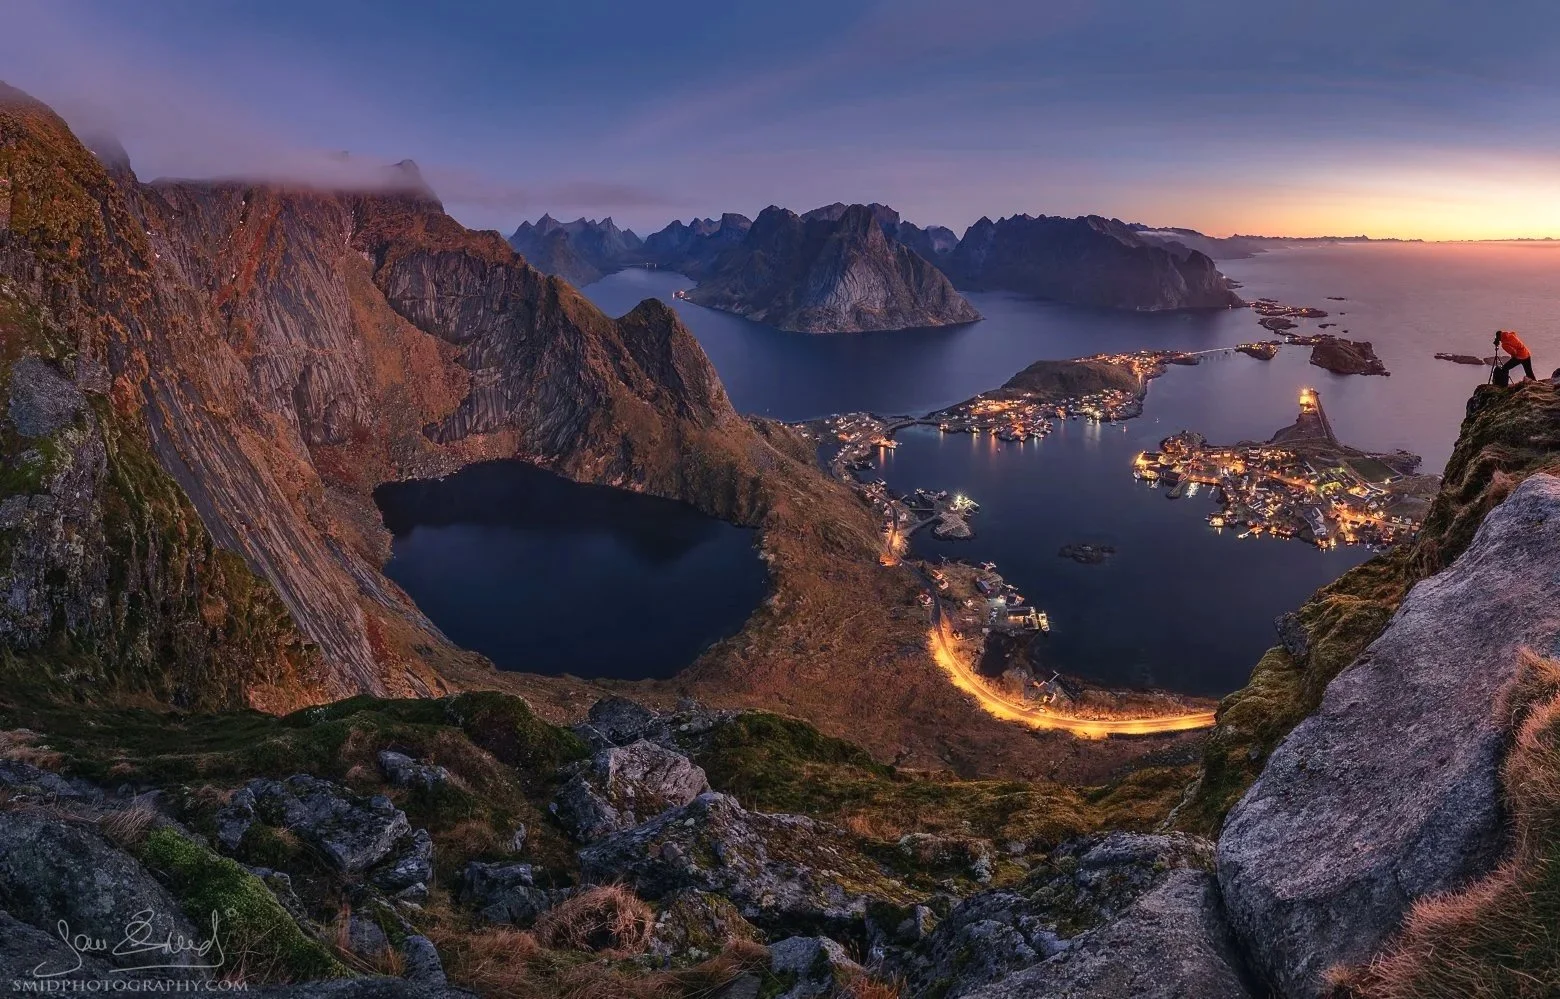
Reinebringen: The Iconic View and Its Changing Face
Reinebringen is the definitive Lofoten viewpoint. At 448 metres, it offers a panoramic gaze over the entire southern archipelago that is, quite simply, spectacular. It is the shot everyone comes for, and despite the crowds, it remains worth the effort.
I remember Reinebringen before it became a "stone highway." Just a few years ago, there were only a few steps at the base; the rest was a treacherous, vertical muddy scramble. During our expeditions, it would take us roughly 2.5 hours to navigate the eroded slope by the light of our headlamps. It was physically punishing and genuinely dangerous, but that massive disadvantage had one incredible upside: we were always alone at the summit. The nature was untouched, the silence was absolute, and the experience was ours alone.
The honest reality in 2026 is different. The route has since been rebuilt by Nepalese Sherpas into a massive stone staircase. While this makes the mountain safer, it has also made it one of the most crowded spots on the islands. At sunrise, do not expect solitude—expect dozens of photographers and hikers, a well-worn foreground, and a logistical puzzle to compose your shot without people in the frame.
Practical Advice for the Modern Photographer:
The Climb: Even with the stairs, it is a serious, steep ascent that demands proper footwear and reasonable fitness. It is not a casual stroll.
Timing: To recapture even a fraction of that old solitude, go at midnight in summer. The golden Midnight Sun light is superior, and the crowds are significantly thinner.
Winter Warning: In winter, the stone steps become a sheet of ice. The route becomes genuinely life-threatening without expert knowledge and professional crampons. Assess the conditions with extreme caution.
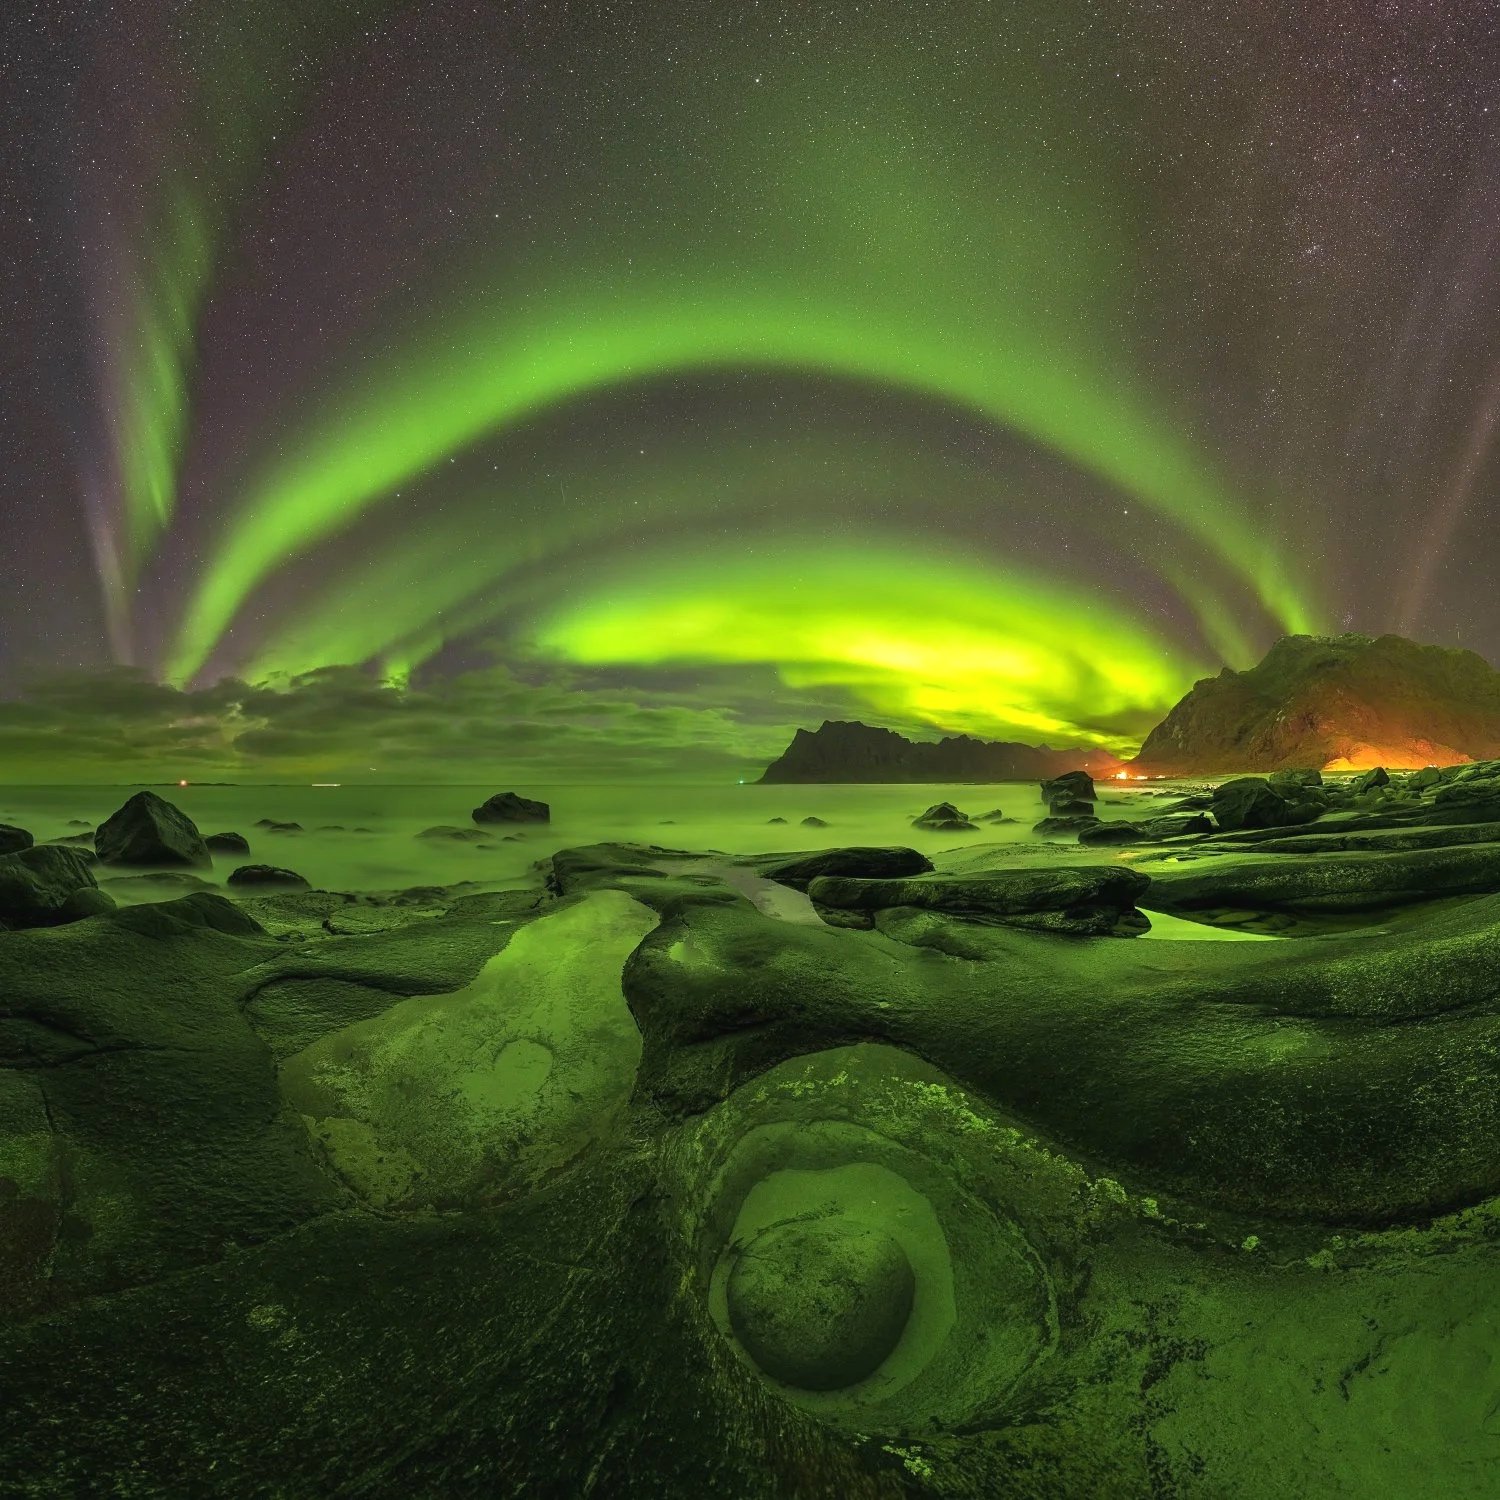
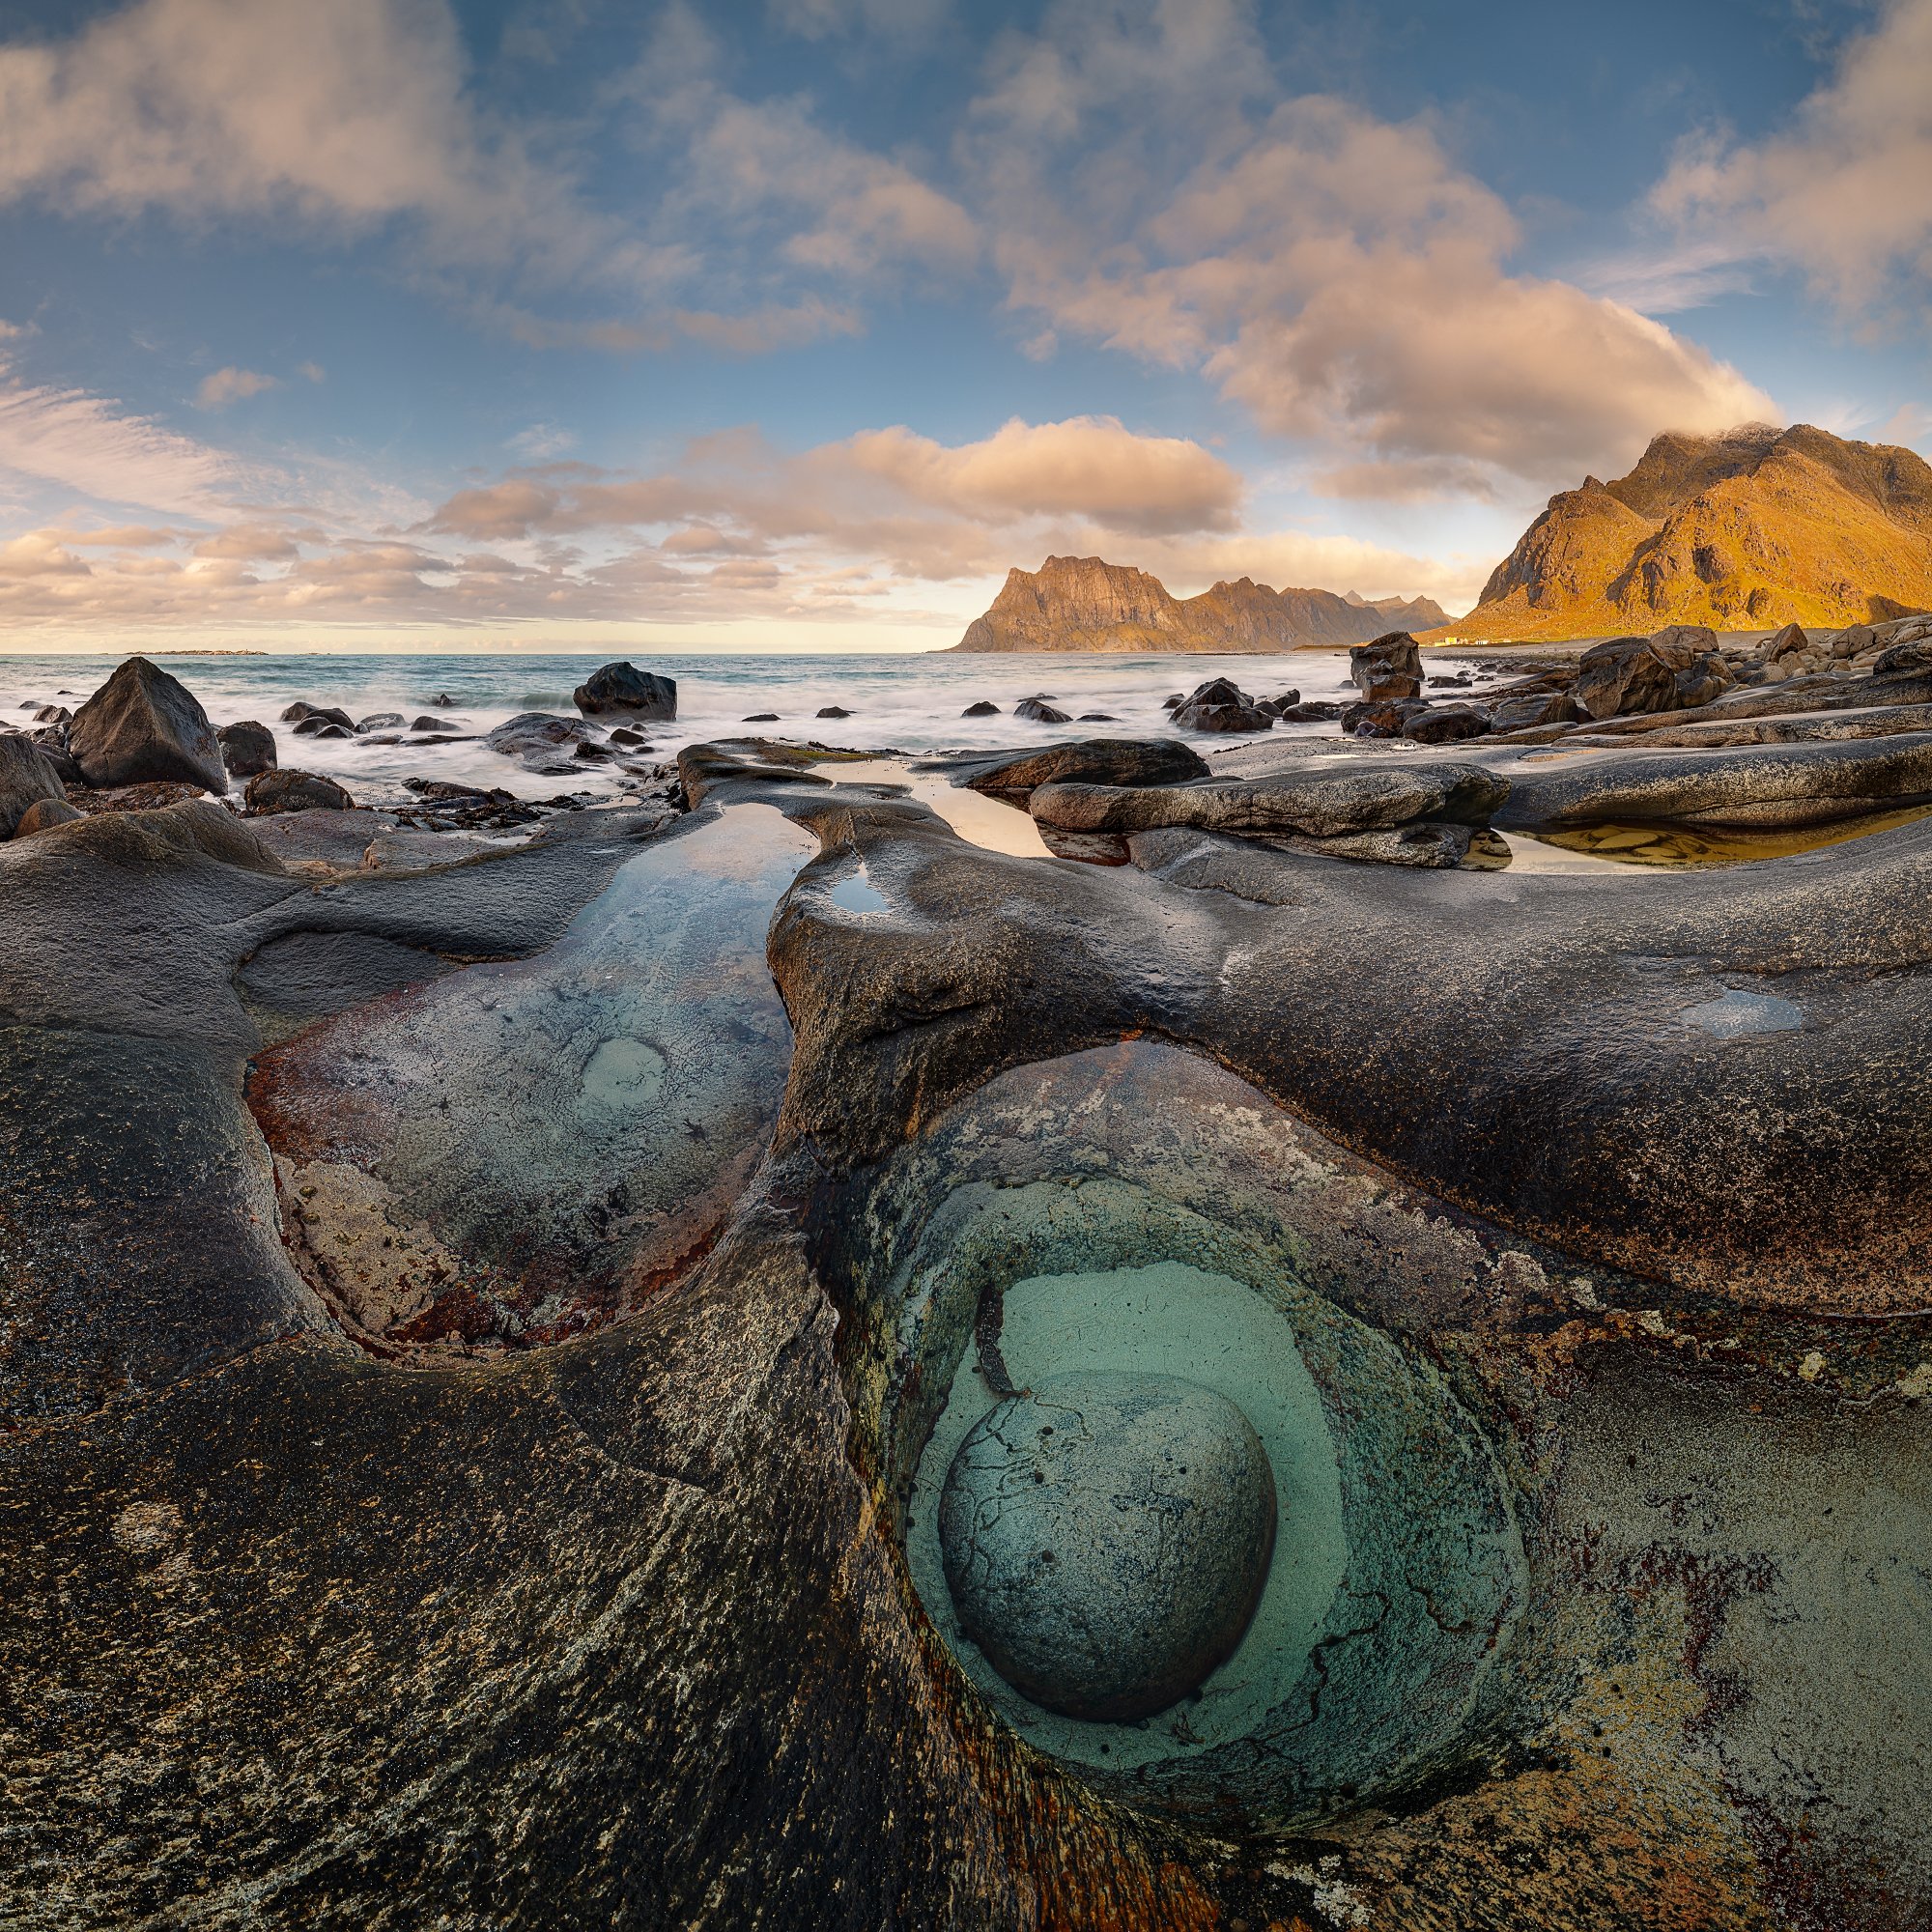
Uttakleiv Beach and the "Eye of the North"
Uttakleiv is legendary for "the Eye"—a rock formation that perfectly frames the Arctic sea. Finding it used to be a rite of passage; today, you just follow the queue of tripods. It’s a reminder that on the Lofoten of 2026, strategy matters more than location.
The Midnight Sun Masterclass Uttakleiv’s true power is its geography. Because it is wide open to the North, it’s a premier stage for the Midnight Sun. In summer, the sun hovers over the horizon, bathing the coast in golden light for hours. If you want endless Arctic gold reflecting in tide pools, this is the place.
The Aurora Dilemma: Why I Stay Away Uttakleiv is technically a fantastic spot for the Aurora Borealis (I’ve captured numerous Aurora compositions here—check my gallery for proof). However, the night reality has become a nightmare.
Light Pollution: The beach is now plagued by photographers running around with high-powered headlamps and cars constantly arriving/leaving with full-beam headlights.
The Verdict: Trying to shoot a clean long exposure here at night is often a battle against ruined frames. Personally, I no longer shoot Aurora at Uttakleiv for exactly this reason. There are better, quieter spots if you know where to look.
The "Non-Negotiable" Reality Check:
The Tide: The Eye is a low-tide-only subject. At high tide, it’s gone. Check the tide tables or you’re wasting your time. Period.
The Crowd: Arrive at least 90 minutes early to claim your sunset spot. The "line" forms fast.
The Light: Sunset hits the arch from the West, but stay late—the transition into "Arctic Blue" is where the real magic happens.
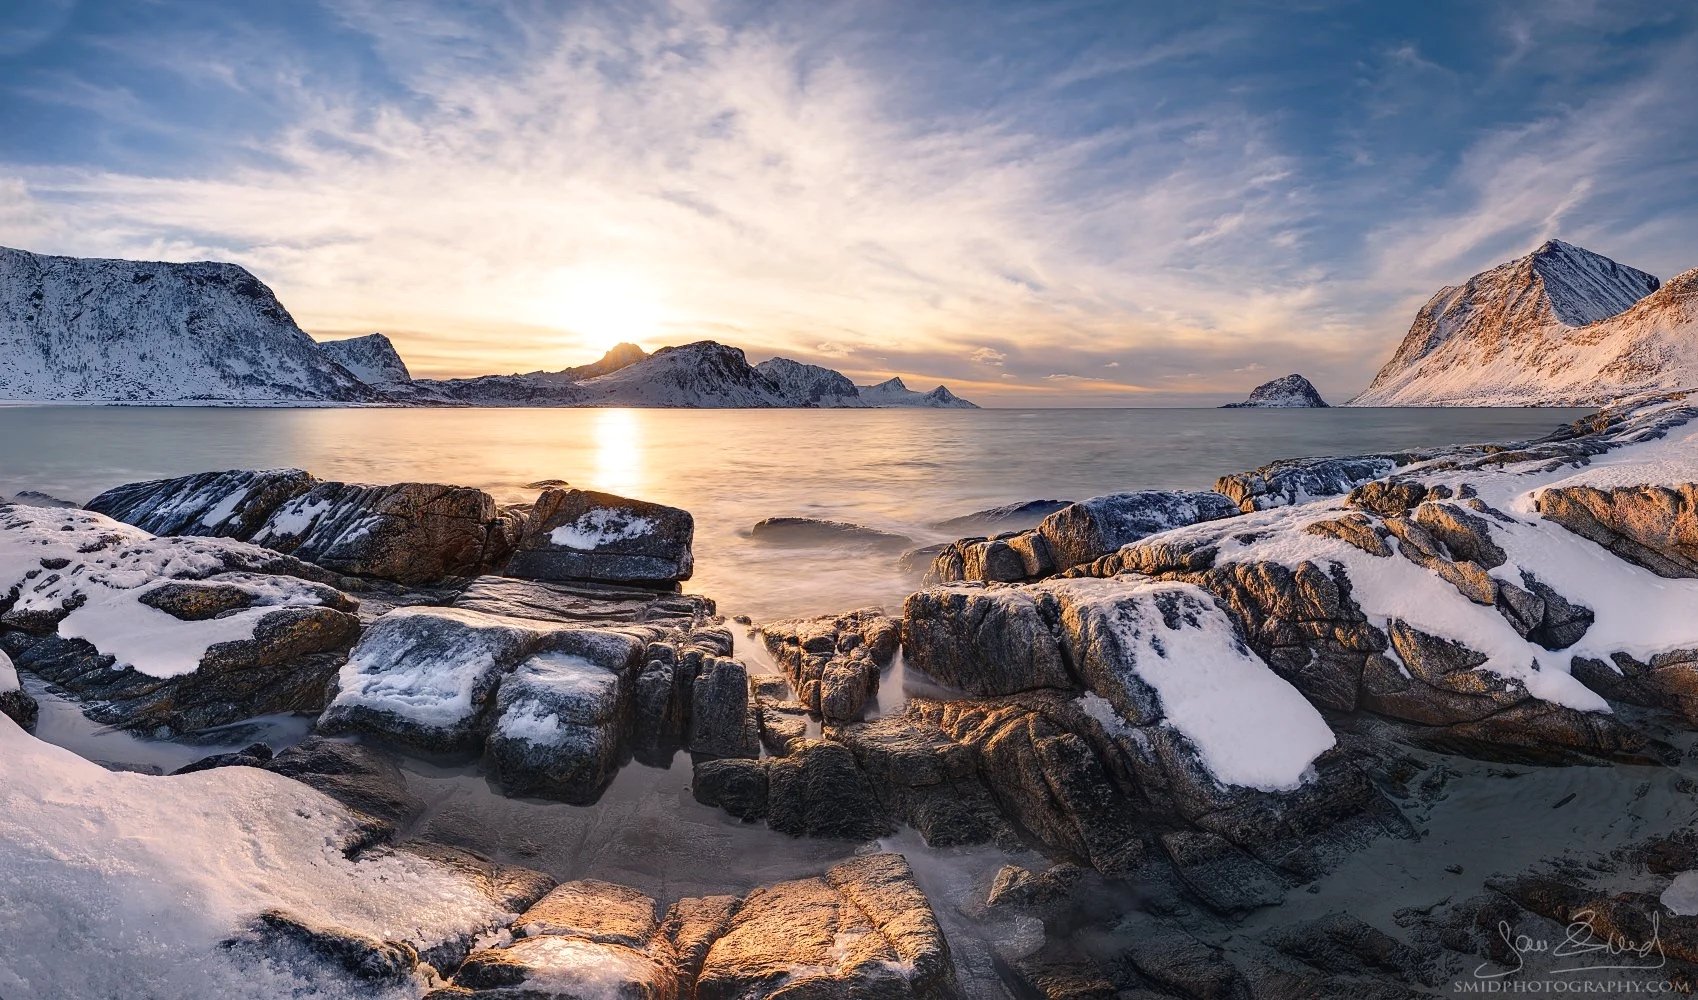
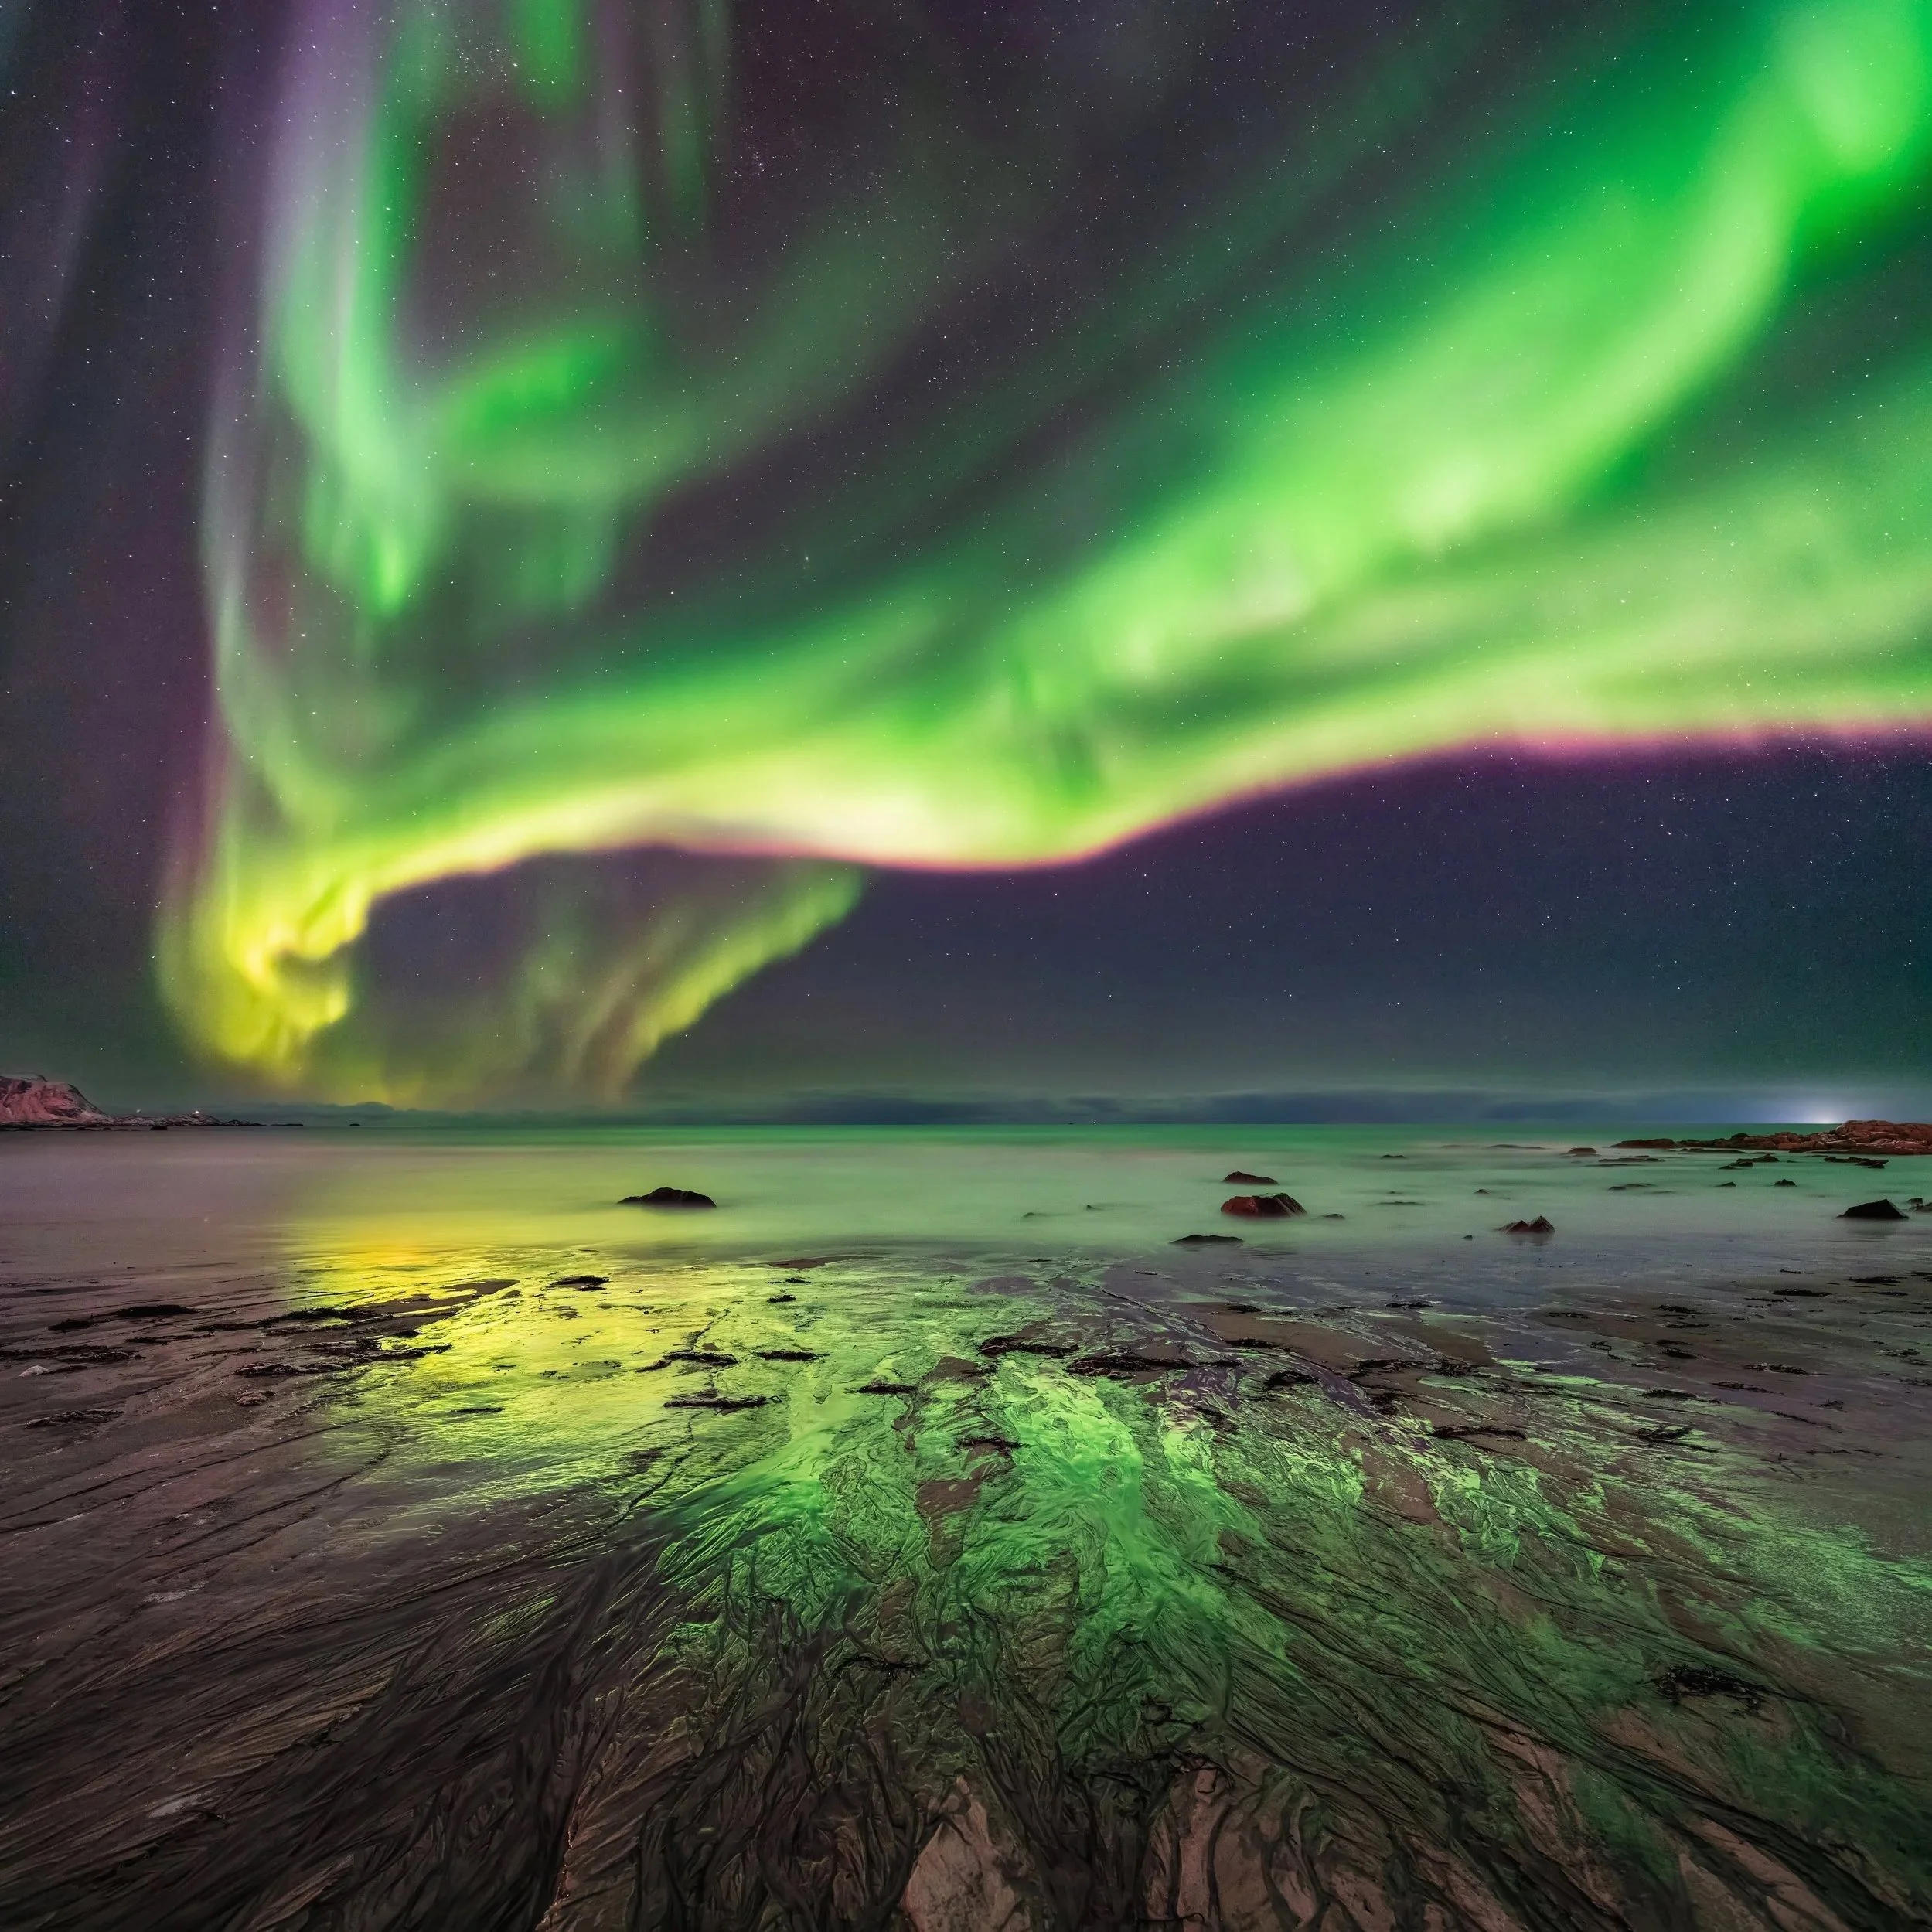
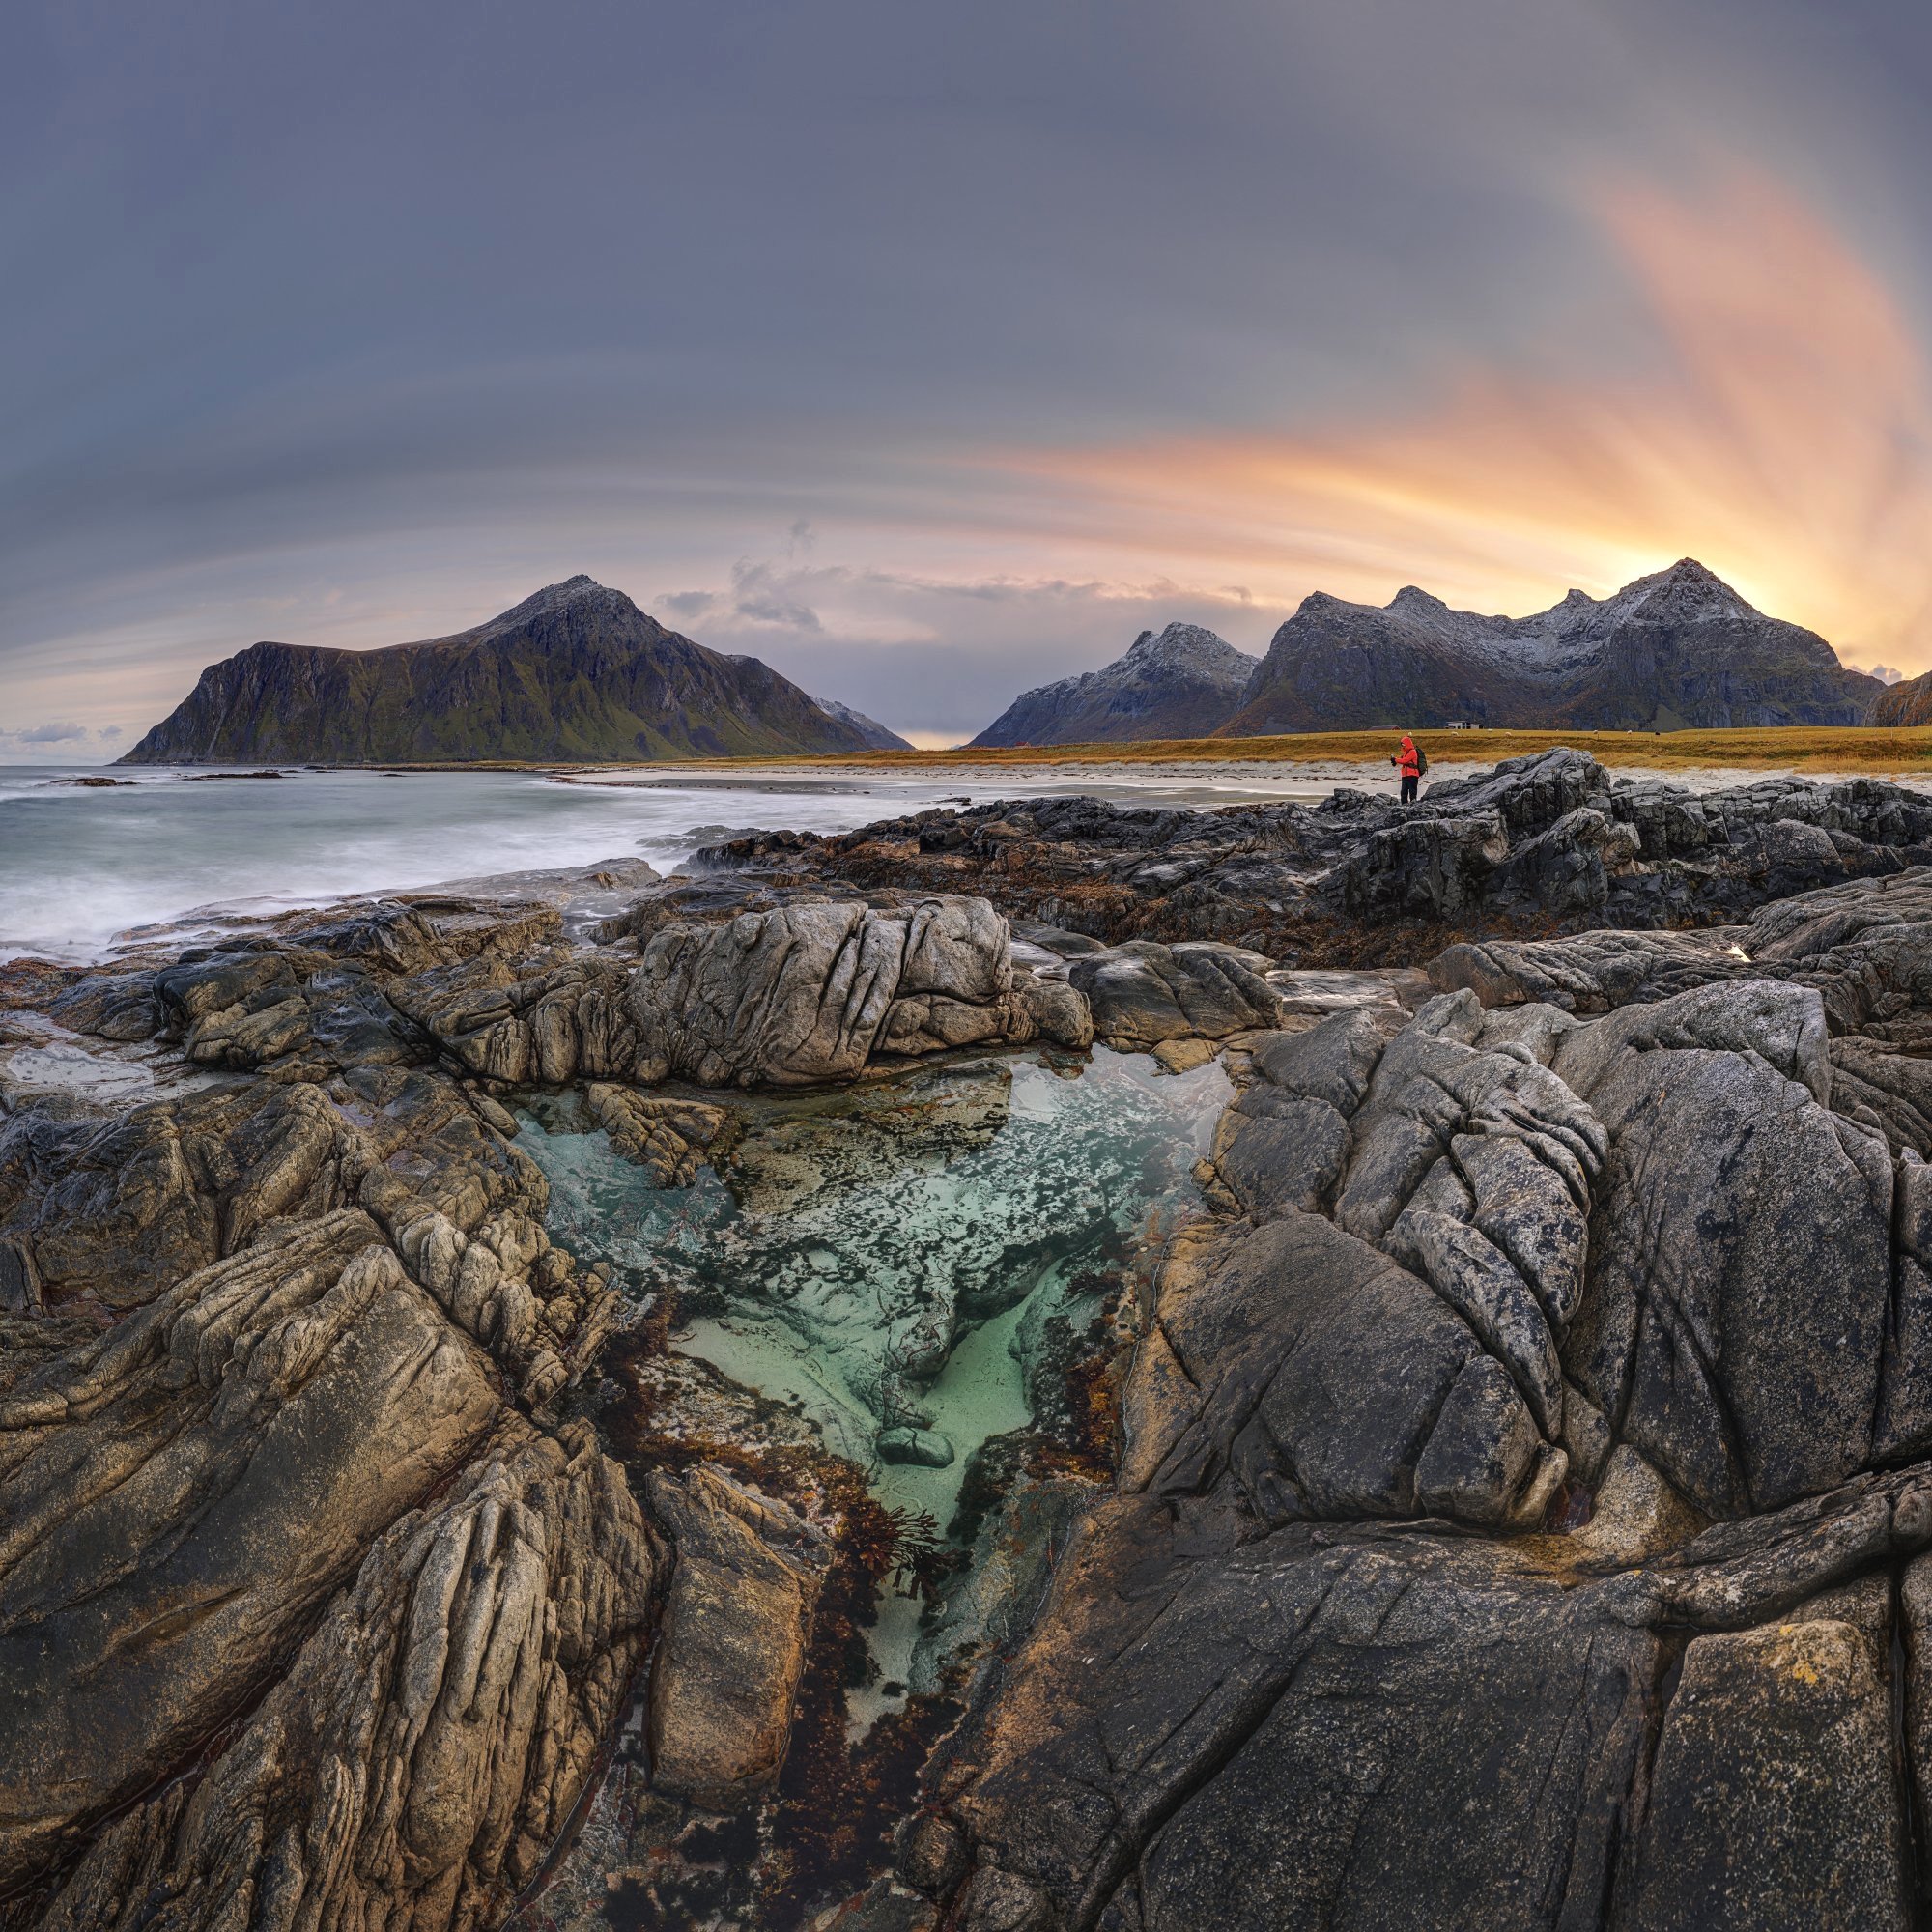
Haukland Beach: The Caribbean of the North
Haukland’s white sand and turquoise water look like the tropics, but the granite peaks are pure Arctic. It’s a top-tier location that recently got a massive upgrade: a large organized parking area and the modern Haukland Stranda Café (bistro/facilities), making it the most comfortable "base camp" for your shoot.
The Power of the North (Midnight Sun & Aurora) Haukland is perfectly oriented toward the North. This makes it a dual-purpose powerhouse:
Summer: An extraordinary stage for the Midnight Sun. The sun hovers over the open sea, casting endless golden light on the sand.
Spring, Autumn & Winter: One of the best Aurora Borealis spots on the islands. With a wide-open northern horizon and no light pollution, you can capture the green lady dancing directly over the ocean.
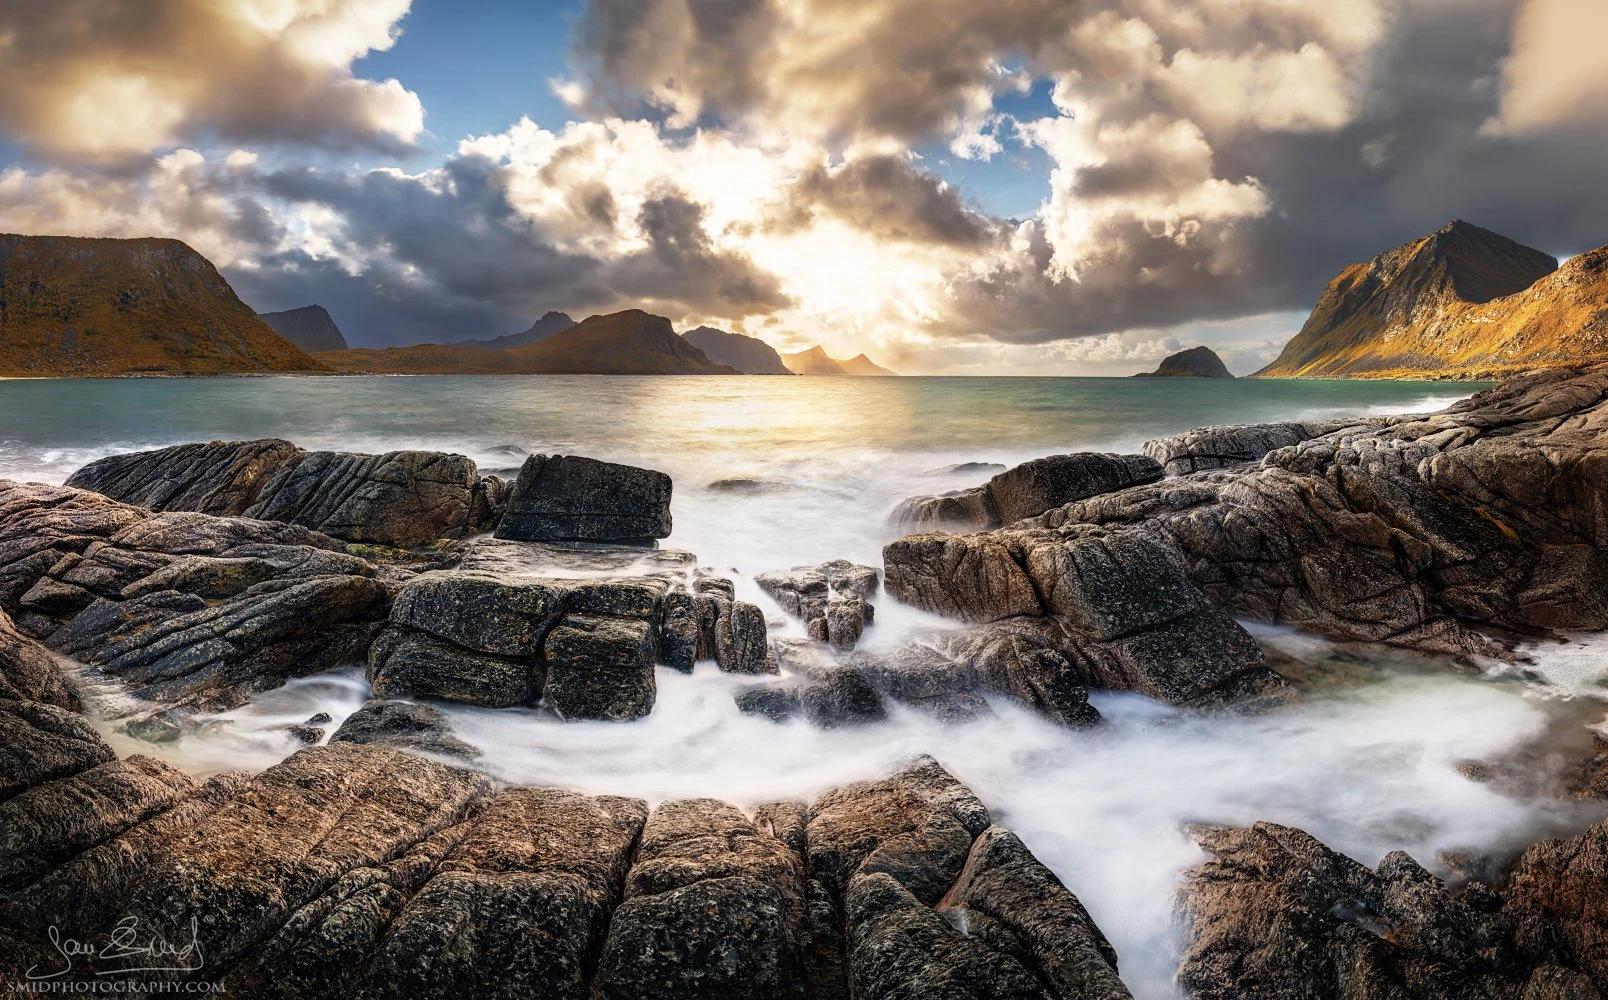
The "Drama" Secret: Sunset & Clouds
Sunset: A premier spot as the sun dips toward the western horizon.
Overcast Days: Don’t stop shooting when it’s cloudy! Heavy, charcoal clouds against the vibrant turquoise water create a brutal, high-contrast color palette that looks much more powerful than a clear blue sky.
Tactical Tip: Escape the Selfie-Sticks The main beach gets crowded fast. Walk ten minutes around the headland to the north. You’ll get the same epic peaks and turquoise water, but with a pristine, undisturbed foreground and zero tourists in your frame. It’s the difference between a postcard and a professional composition.
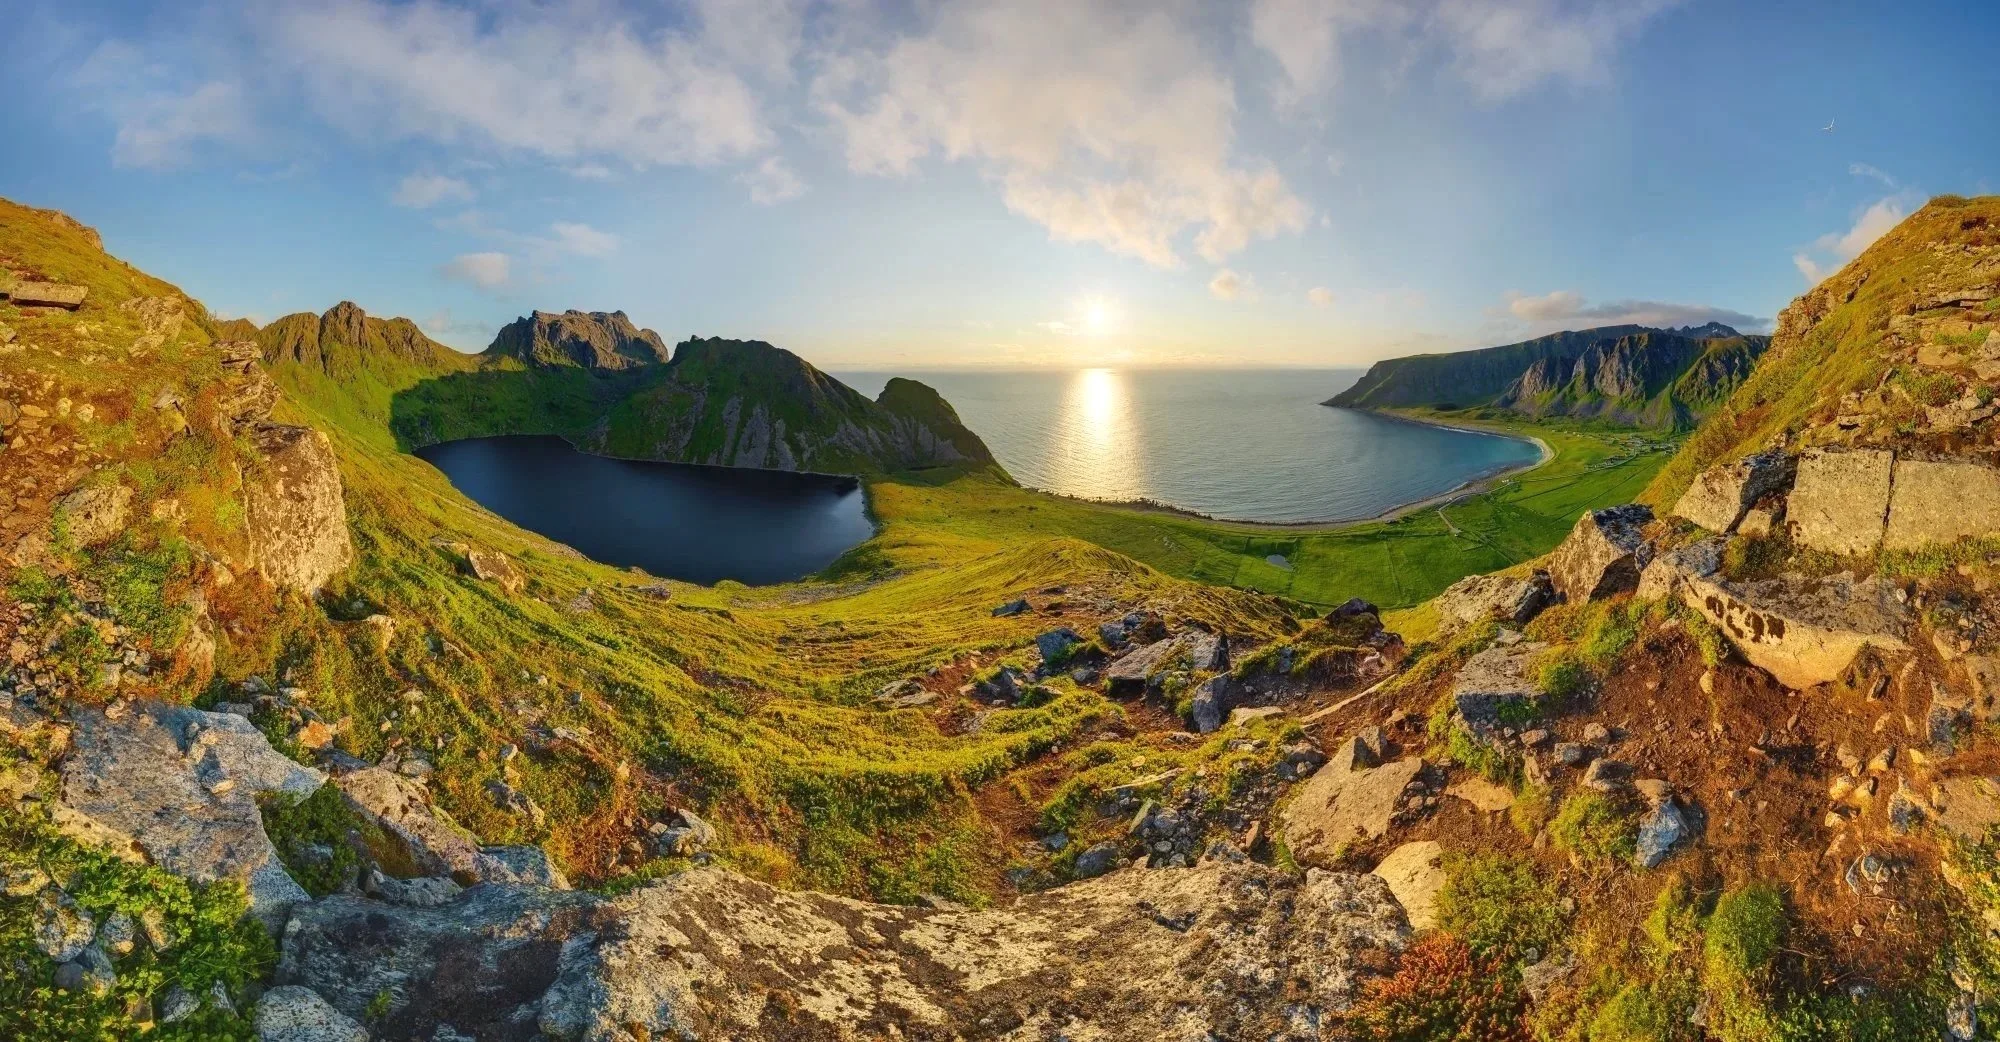
Unstad Beach: The Wild Atlantic Spirit
Unstad is Lofoten's premier surf beach—dramatic, exposed to the full Atlantic swell, and genuinely wild. Unlike the sheltered bays nearby, Unstad feels raw and untamed. It’s a place where surfers ride the waves year-round, even in the dead of winter when the Arctic swells are at their most powerful.
The Insider Perspective (Literally) While the beach itself is beautiful, the most powerful composition isn't found at sea level.
The Secret Viewpoint: When you drive through the tunnel and begin the descent toward the village, stop before you reach the bottom and turn back. Just after the tunnel exit, there is a path to the left that climbs a short distance.
The Shot: From this elevation, you get a bird’s-eye perspective of the perfect curve of the beach, the breaking white foam, and the massive peaks framing the valley. It’s a view most visitors drive right past.
Action Photography: Bring Your Long Glass If you want to capture the surreal sight of surfers carving through Arctic water, do not forget your telephoto lens. You’ll need the reach to get close to the action. Surfers are in the water almost constantly, providing a fantastic dynamic element to your landscape portfolio.
A Reward for the Soul (and Stomach) Unstad is further off the main track, meaning it’s generally much quieter than Haukland or Reine. This makes it the perfect place for a break.
The Cinnamon Bun Ritual: You must stop at the local café (Unstad Arctic Surf). They serve what are arguably the best cinnamon buns in all of Lofoten. It’s a favorite haunt for locals and travelers alike, but it rarely feels "crowded" in the tourist-trap sense. Grab a coffee, a bun, and soak in the world-class surf vibe before your next shoot.
Experience the Atmosphere: Behind the Scenes in Lofoten
To get a true sense of the Arctic environment and our professional workflow, watch the backstage videos below. The first provides an insider’s look into the techniques of Midnight Sun photography, while the second is a purely cinematic drone perspective of the raw, frozen beauty we capture during our winter expeditions.
Skagsanden: The Black Sand Canvas
Skagsanden on Flakstadøy is unlike any other beach in Lofoten. Its dark, almost black sand creates a high-contrast stage for some of the most intricate natural textures on the islands. While most photographers stop for ten minutes, I typically spend hours here—this beach is a living gallery that changes with every retreating wave.
The real secret lies in the sand structures. Water flows from the massive hills across the road, filters underneath the asphalt, and emerges on the beach to carve unique, fractal-like deltas. To truly appreciate the scale of these patterns, watch the drone video in this article—from above, they look like alien landscapes that are impossible to fully see from the ground. Just keep an eye out for seaweed; sometimes it adds a nice pop of color, but other times it’s just foreground clutter you'll need to work around.
Lighting and The Aurora Reality This is a true 24-hour location. With its wide-open northern horizon, it’s a premier spot for the Midnight Sun and sunsets that drop directly over the Atlantic. Even on overcast days, the flat light under moody clouds allows the dark textures of the sand to dominate the frame. It’s also a powerhouse for the Aurora Borealis (I’ve captured some of my favorite images here—check my gallery), but the night reality is a battle. Because the beach is right next to the main road, your long exposures will be constantly threatened by passing cars with full-beam headlights and crowds of photographers with blinding headlamps.
Practical Tips for the Field:
The Tide: High tide is a disaster here—all the interesting stones and sand structures end up deep underwater. Aim for mid-to-low tide to reveal the best foregrounds.
The Parking Police: Local authorities are brutal. Park only in designated lots, never on the grass or road shoulder. If you ignore the signs, expect a massive fine behind your windshield wiper.
Facilities: There are modern toilets right at the parking lot, making this one of the most comfortable "wild" spots to spend a few hours waiting for the light.
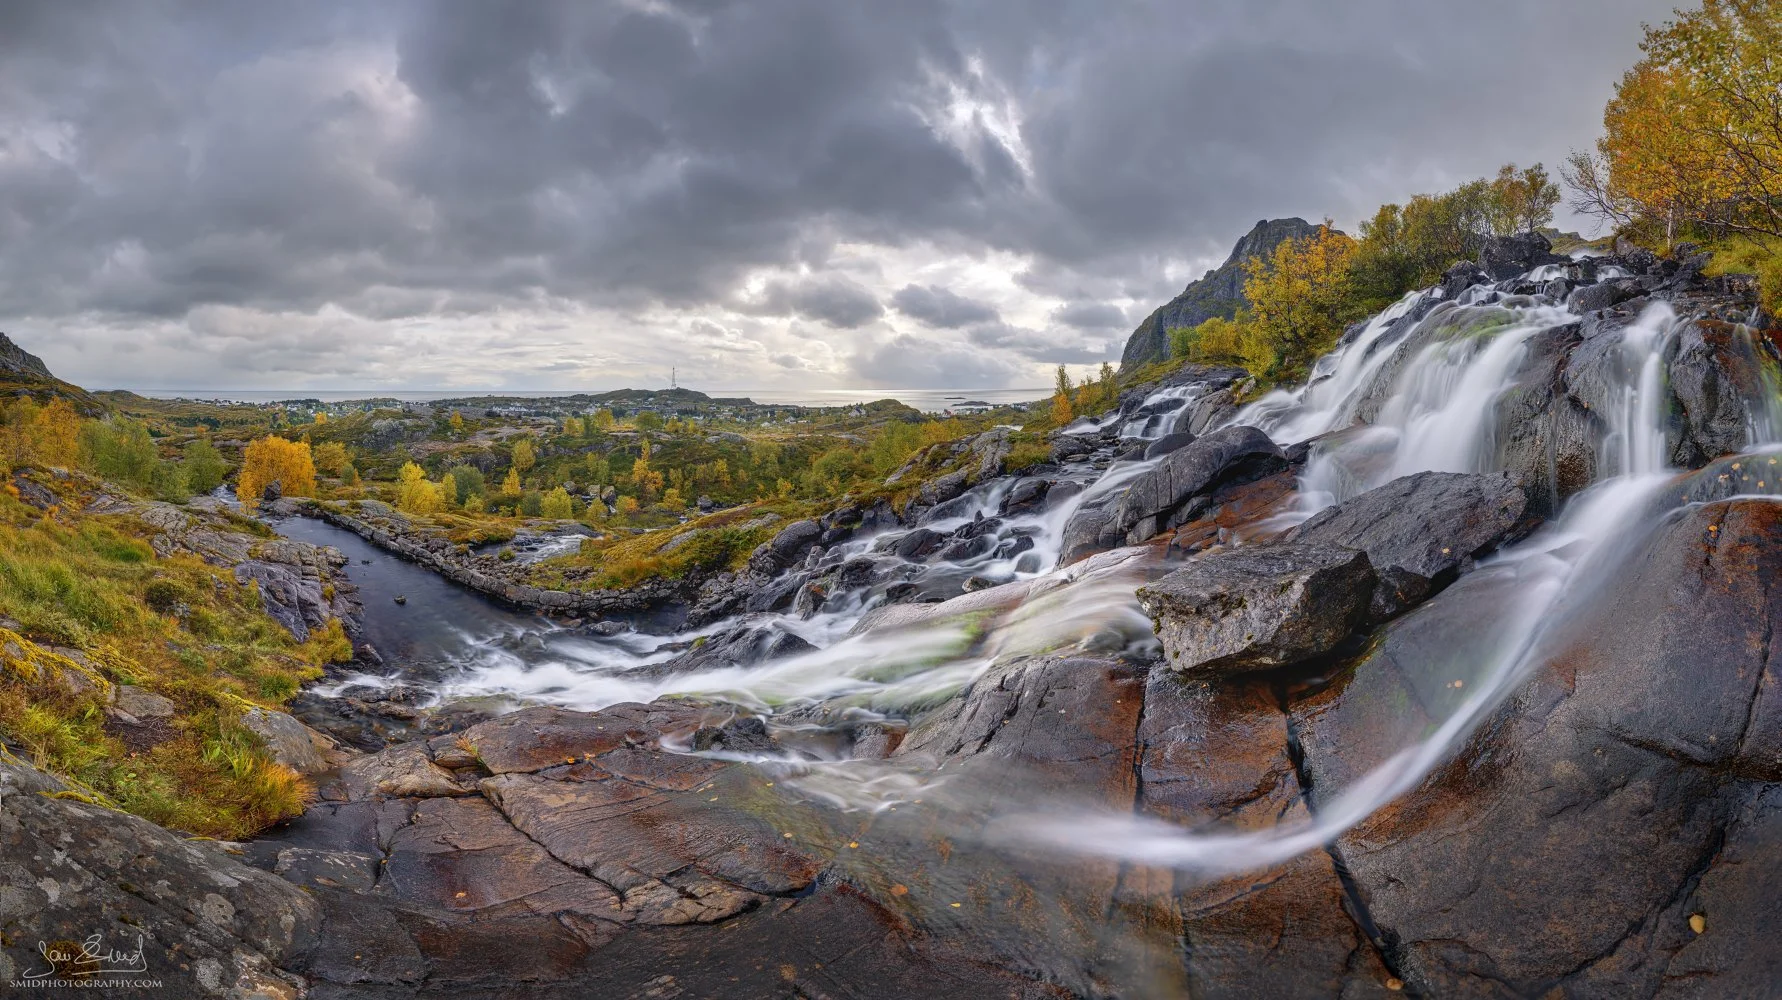
The Waterfall Reality Check: Skip Bø for Sørvågen
This is one of the first "insider secrets" I share with every expedition: stop following generic guidebooks blindly. Many guides feature a waterfall at Bø (near Flakstadpollen). To put it bluntly, it’s a disappointing trickle. It only appears in guidebooks because it’s five meters from the road, not because it’s actually impressive.
Sørvågen is the real deal. In this valley, you’ll find three substantial waterfalls side-by-side. These are genuinely powerful cascades that fill the frame with movement and energy. While they are extraordinary during the spring snowmelt, my absolute favorite time here is Autumn. In September and October, the surrounding birch trees turn a vibrant, golden yellow. The contrast of the rushing water against the gold-orange slopes is the pinnacle of Lofoten landscape photography.
The Middle Waterfall and Beyond If you have to choose one, head for the middle waterfall. I’ve spent countless hours there because it offers a seemingly endless variety of compositions using the rocks as leading lines.
But if you want to take it even further, Sørvågen is the starting point for the hike to Tinstinden. This peak is an incredible spot for both sunrise and the Aurora Borealis. It’s about a 1.5-hour climb, but be prepared: the final section is quite steep and equipped with chains for safety. It’s a serious hike, but the view over the village and the sea is unmatched.
Practical Tips for the Field:
The Gear: Do not leave your rorbu without a circular polarizer and an ND filter to manage reflections on the wet rocks and to smooth out the water.
The Hike: If you head for Tinstinden, wear proper boots and be ready for the chains. For Aurora, don't forget a reliable headlamp for the descent.
Parking: There is a small parking lot at the trailhead. It was recently made a paid lot, so keep your app or card ready to avoid a fine.
The Verdict: After 25 expeditions, my advice remains: Drive past the trickle at Bø. Continue to Sørvågen. You will understand why the moment you set up your tripod.
Fredvang Bridges
The twin bridges at Fredvang are a composition gift — strong curved leading lines, framed by peaks on both sides, with the fjord and open sea beyond.
From ground level, the bridges are good. From the air or from elevation, they are exceptional. If you fly a drone, Fredvang is one of the strongest subjects on the island — the geometry of the two curves against the water and mountains is genuinely striking from above.
The best elevated ground position is Volandstinden — the ridge above the bridges to the east. The climb is moderate and the perspective completely transforms the composition, showing both bridges in their full context with the sea beyond. This is the shot that makes the ground-level version look like a draft.
Nusfjord — A Note of Caution
Nusfjord is a historic fishing village and genuinely atmospheric. The preserved rorbuer, the smell of dried cod, the reflections in the harbour — it has photographic potential for intimate, documentary-style work.
Practical reality in 2026: following a change of ownership, Nusfjord now charges 100 NOK per person entry — even if you are only going to the café to spend money there. Many photographers find this frustrating, and understandably so.
My honest recommendation: skip Nusfjord as a photography destination or view it from the parking area above the village, which gives you a clean overview shot without the entry fee. For the authentic rorbuer atmosphere, the village of Å delivers everything Nusfjord offers without the entry charge and with fewer crowds.
Å: The Authentic Edge of the World
The E10 highway ends at Å, the southernmost settlement in Lofoten. It is quieter than Reine, more authentic than Nusfjord, and consistently underestimated. While the village itself is a living museum of fishing history, the true power of this location is found just a few minutes further.
To the End of the Archipelago Once you’ve explored the historic village center, continue through the final tunnel to the very end of the road. Park there and take the short walk out onto the cliffs. This is where you truly feel the scale of the Lofoten Wall.
The Horizon: Looking south across the treacherous waters of the Moskenstraumen, you can clearly see the distant silhouette of the island of Værøy rising out of the ocean.
The Peaks: Above you tower the ridges of Andstabben, providing a massive, dark backdrop that contrasts perfectly with the open sea.
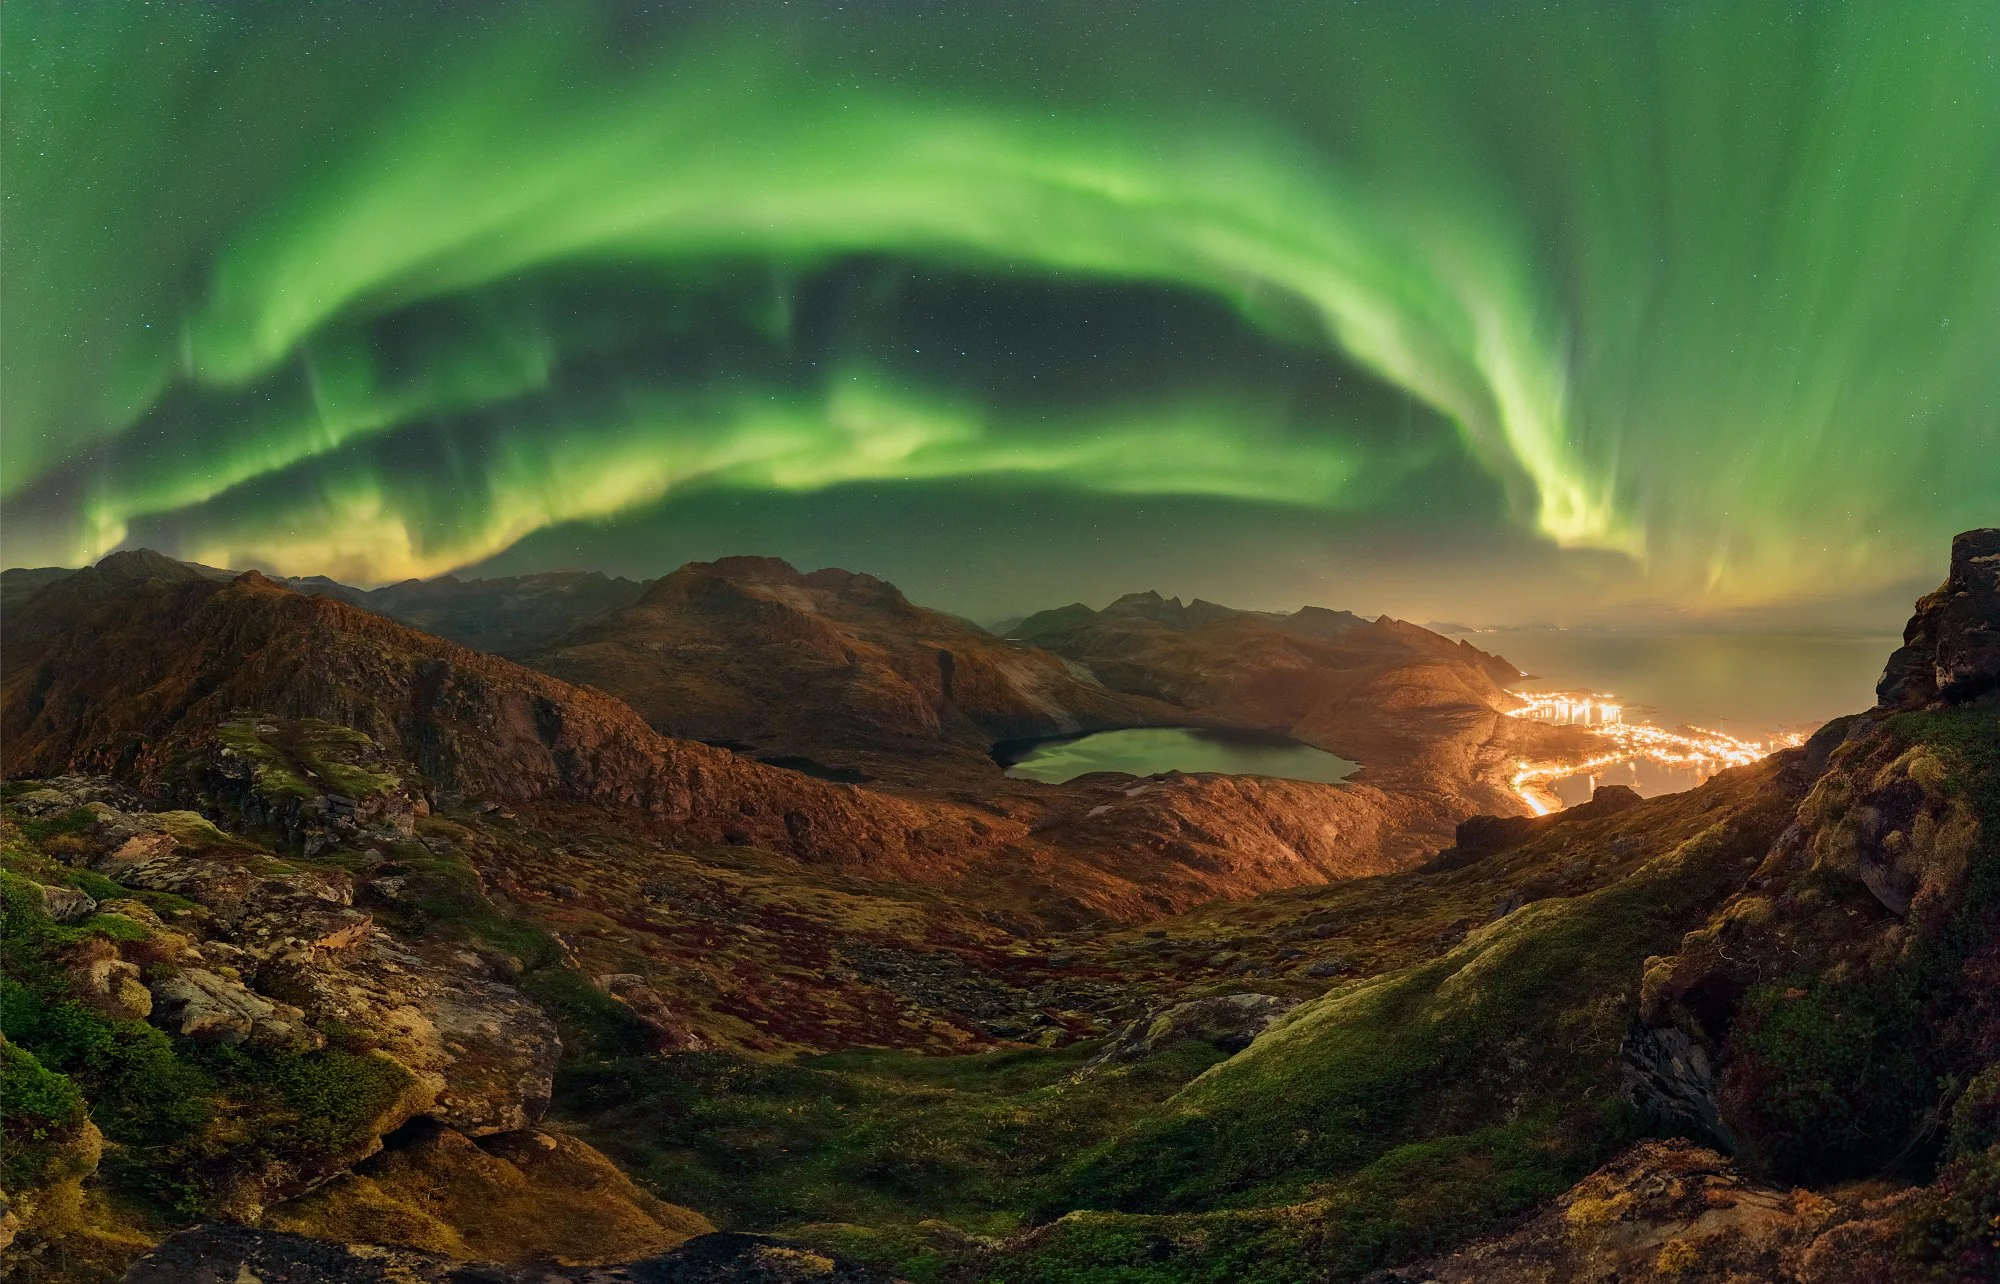
The Vibe: This spot feels like the edge of the world. It is raw, often windy, and offers an unobstructed view that is spectacular for both the Midnight Sun and the Aurora Borealis.
Practical Tips for the Field:
Perspective: Don't stay on the path. Explore the rocks to find a composition that balances the distant island of Værøy with the crashing waves in the foreground.
Quietude: Even when the village of Å is quite busy with tourists, very few people make it all the way to the outer cliffs. It’s one of the few places where you can enjoy the Arctic silence.
Gear: If you are shooting at the end of the path, bring a telephoto lens to pull Værøy closer and a wide-angle to capture the immense scale of the cliffs and the sky.
The Ridge Hikes — Where the Real Panoramas Are
If you are willing to walk, Lofoten rewards you with perspectives that no road can reach. Here are the hikes worth knowing:
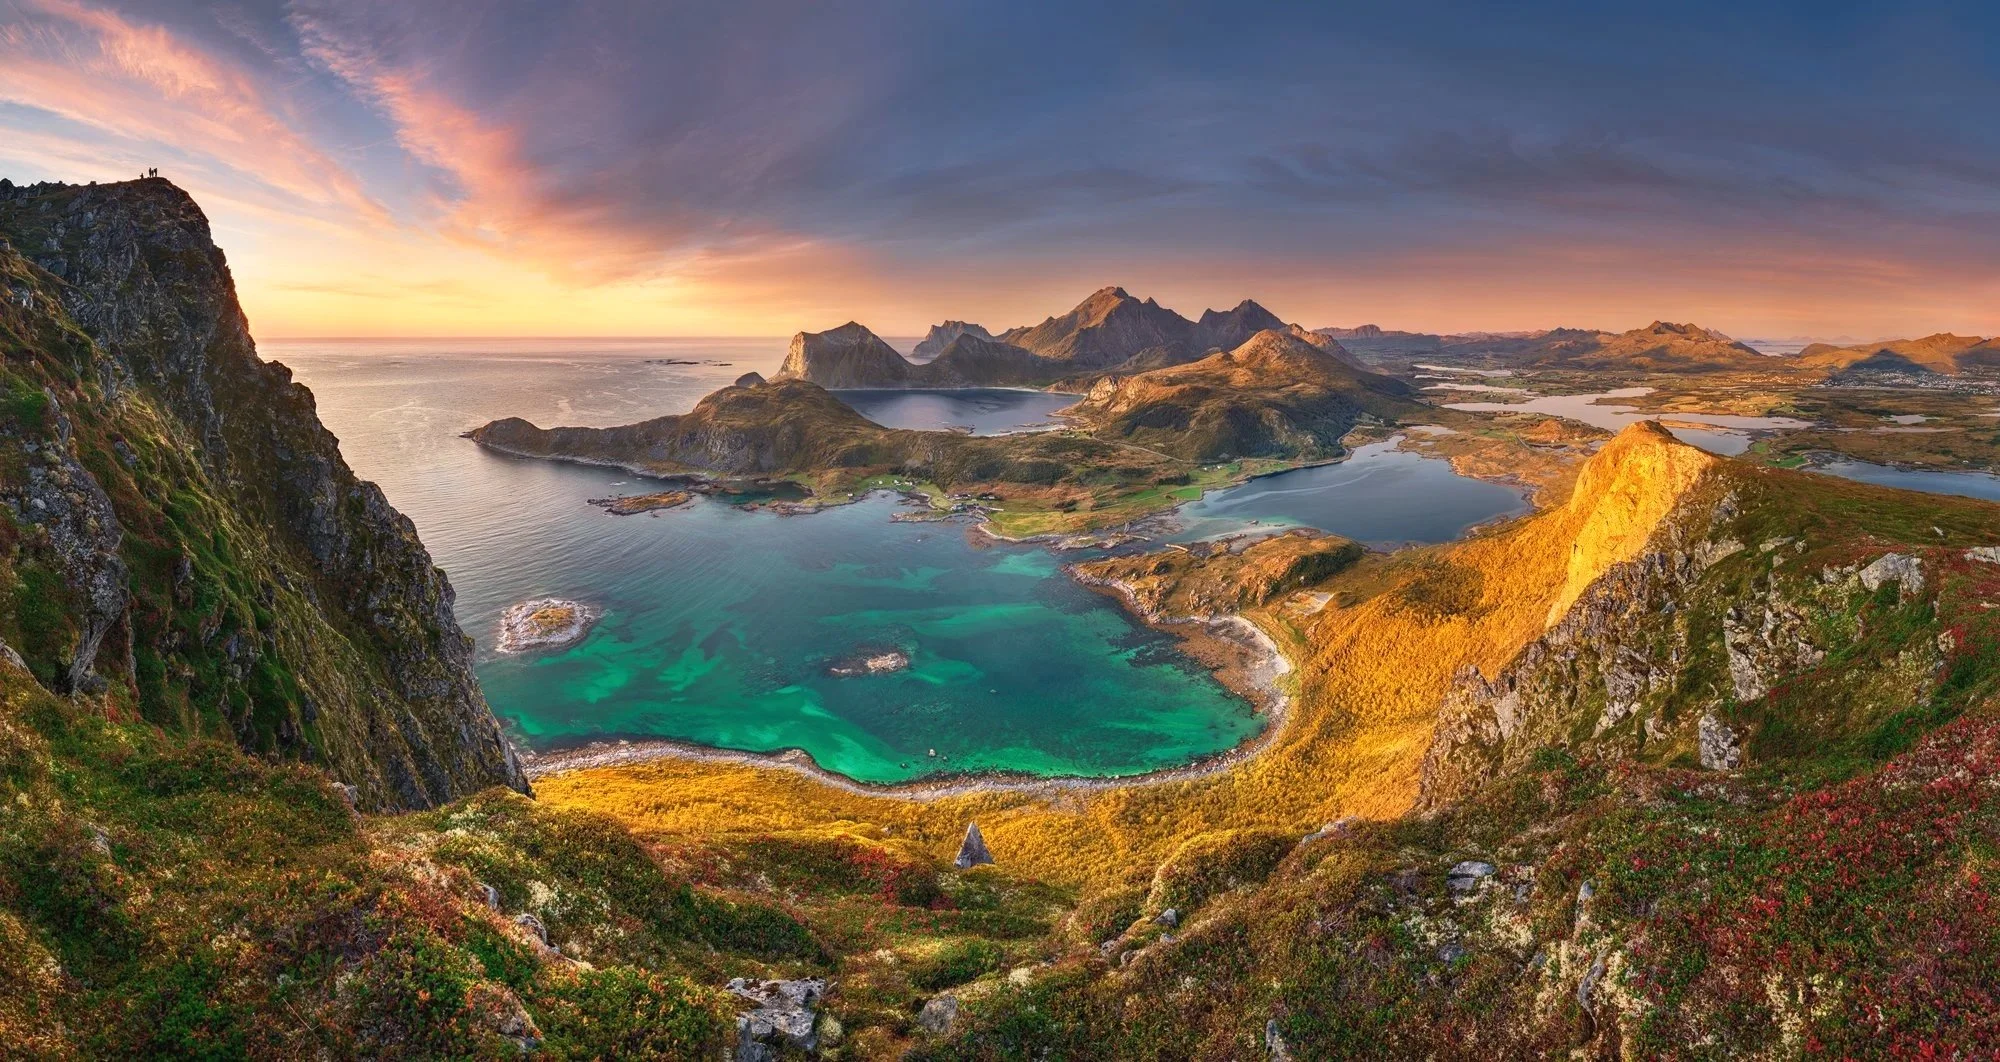
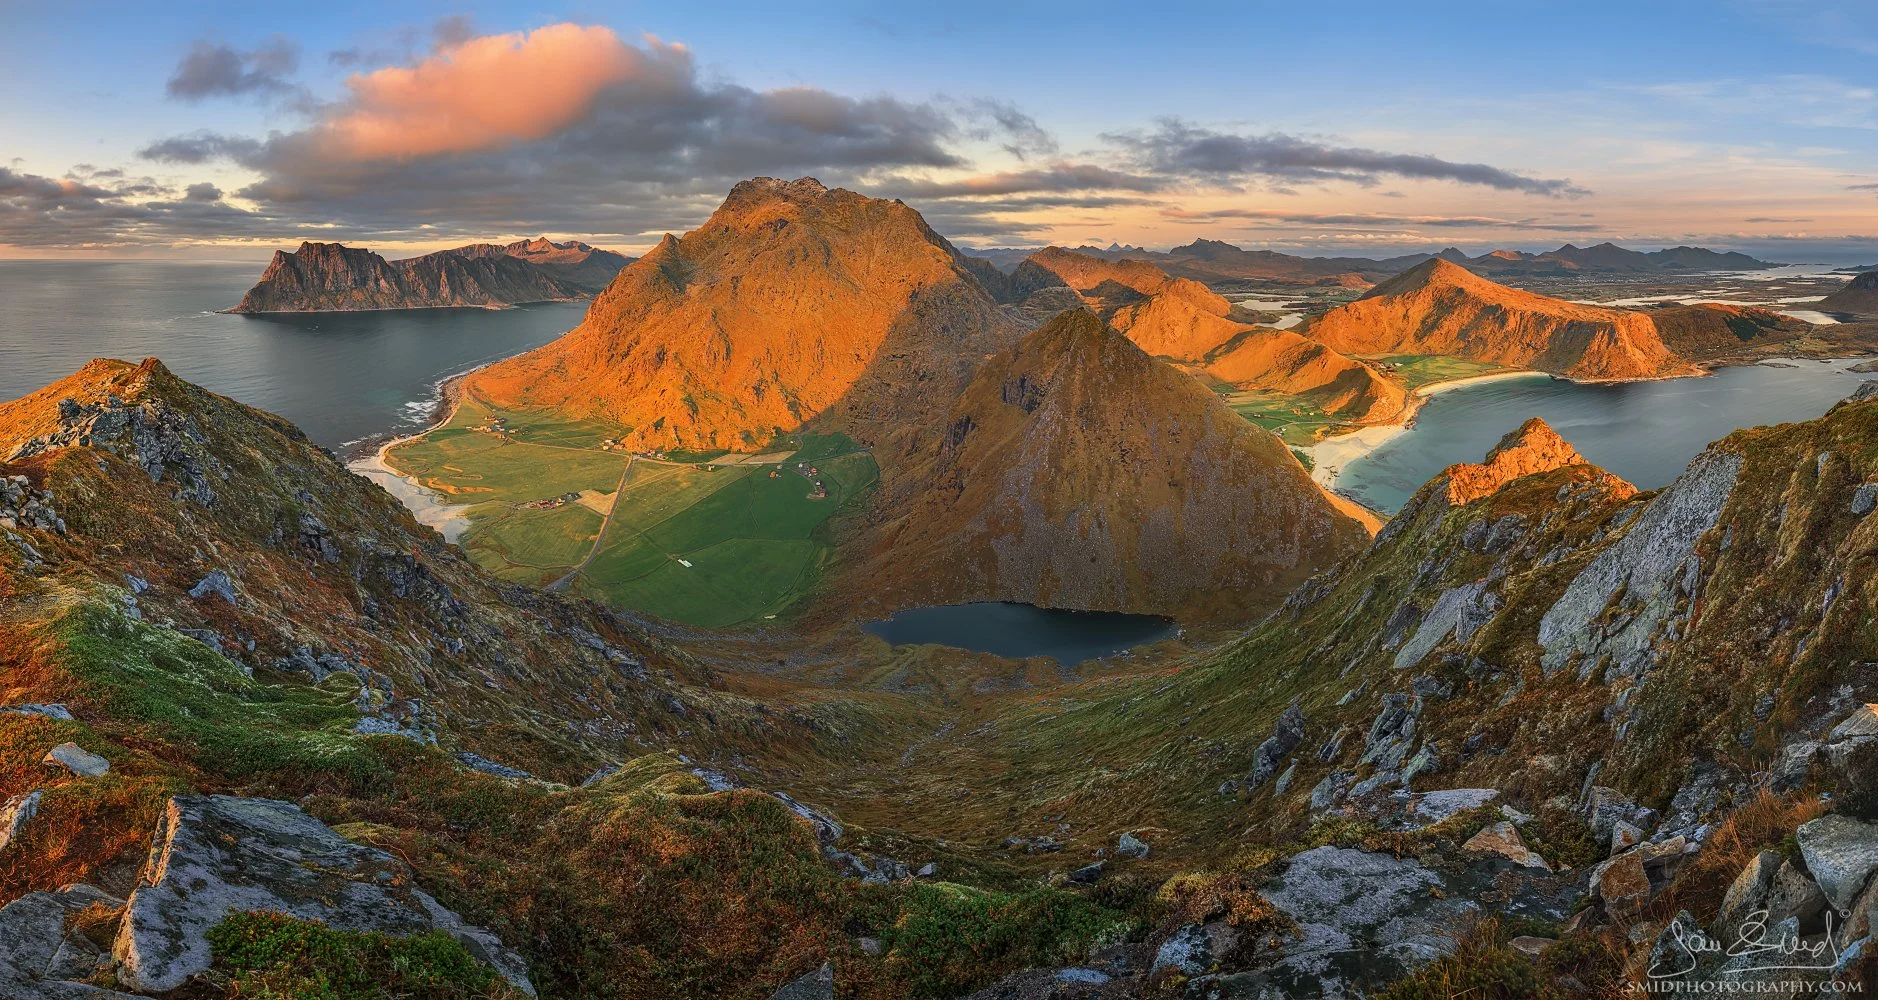
Offersøykammen: My Absolute Favorite Viewpoint
If you ask me which single peak offers the most "bang for your buck" in all of Lofoten, it’s Offersøykammen. This is my personal favorite spot on the entire archipelago. While the masses are queuing up at Reinebringen, Offersøykammen offers a far more peaceful, yet arguably more spectacular, 360-degree experience.
The Ultimate All-Rounder The beauty of this peak is its versatility. Because the summit provides an unobstructed view in every direction, it is a masterclass location for any light condition:
Sunrise & Sunset: You can look east toward the dramatic fjords as the first light hits, or turn west toward the famous beaches as the sun dips into the Atlantic.
Midnight Sun: During summer, this is one of the best stages for the 24-hour sun. You can track the golden light across the entire landscape without ever having to move your tripod more than a few meters.
The Photographer's Playground The compositional options here are truly endless. Whether you are hunting for intimate details in the valley below or shooting massive 360-degree panoramas, Offersøykammen delivers.
Drone Heaven: If you fly a drone, this is the place to do it. The perspective over the turquoise waters and the winding bridges of the E10 is world-class.
The Experience: The trail is easy to follow. Depending on your pace, you can reach the summit in roughly one hour. It’s a relatively straightforward climb, making it one of the most accessible "high-reward" spots for a heavy camera bag.
Practical Tips for the Field:
Composition: Don't just focus on the sea. Look back toward the interior mountains for dramatic, layered textures, especially during the blue hour.
Weather: Because the summit is exposed, it can be very windy even if it’s calm at the parking lot. Bring a sturdy tripod and a windproof layer.
Stay Late: Even after the "main event" of a sunset, stay for the transition. The way the light lingers on the peaks from this height is something you won't find at sea level.

Mannen: The Haukland Perspective
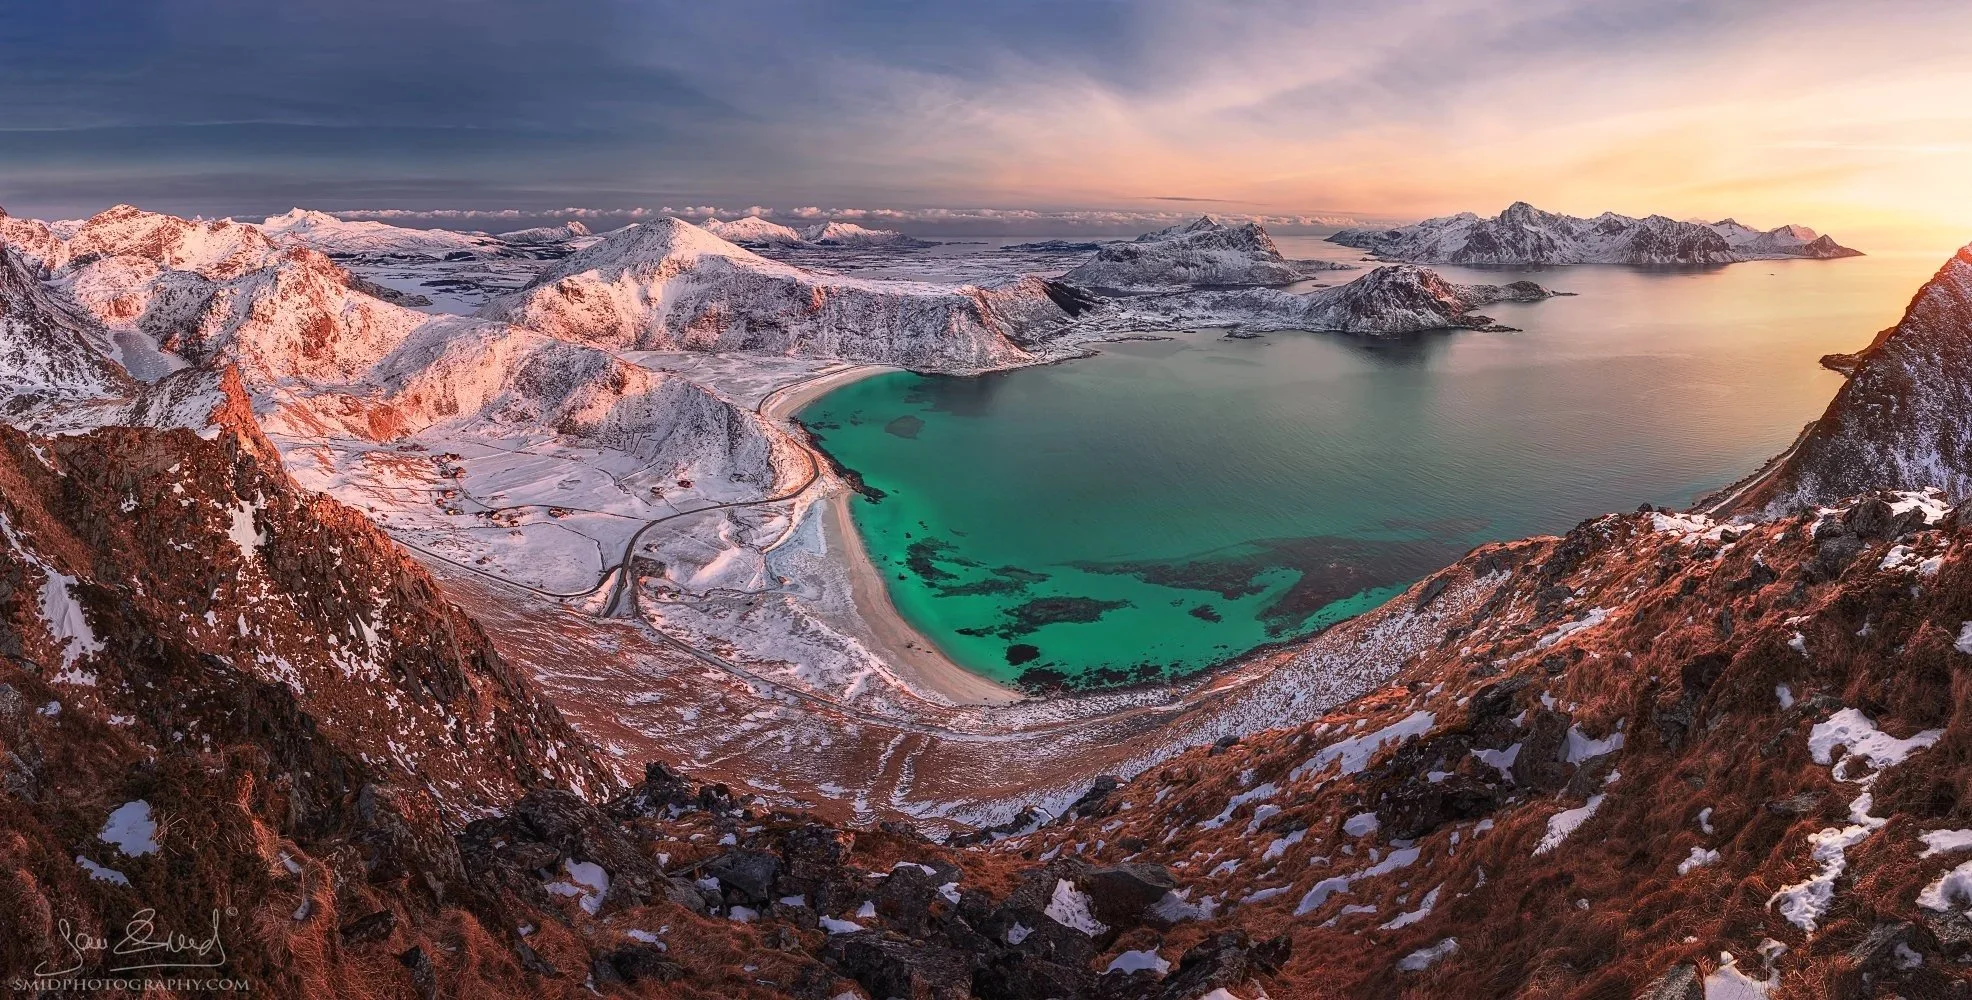
If you want to see the true "Caribbean" colors of Haukland Beach, you have to get above them. Mannen is the answer. While Haukland is beautiful from the sand, the perspective from the summit of Mannen is what truly reveals the turquoise intensity of the water and the perfect curve of the shoreline.
The Local’s Shortcut Mannen is a relatively easy 50-minute hike that starts directly from the Haukland Beach parking lot. One thing to note: the trail is not officially marked with signs, but you won’t get lost. Because this is a massive favorite among the locals, the path is well-worn and very easy to follow. It’s a short, steep burst of effort that pays off with one of the most iconic views in the archipelago.
The View That Never Fails From the summit, you aren’t just looking at Haukland. You get a sweeping panoramic view that includes the neighboring Offersøy and the rugged peaks stretching toward the horizon.
The "Blue" Shot: This is the best place to capture the contrast between the white sand, the turquoise shallows, and the deep Arctic blue of the open sea.
Drone Alternative: While Mannen is great for drones, the hike itself is so short and rewarding that I always recommend standing on the edge personally to feel the scale of the landscape.
Practical Tips for the Field:
The Ascent: Start at the Haukland parking lot and look for the path heading up the ridge. Even though it's "easy" by Lofoten standards, wear proper hiking boots—the grass can be slippery after rain.
Lighting: Mannen is spectacular for the Midnight Sun, where the low light makes the turquoise water glow from within and carves out every texture in the surrounding mountains. But don't make the mistake of thinking this is only a summer location.
Autumn & Winter: I love shooting here in the shoulder seasons. Autumn brings deep, moody tones to the ridges, while Winter transforms the landscape into a high-contrast, minimalist masterpiece of snow and sea.
My Top Choice: While it performs all day, sunset is my absolute favorite time to be on the summit. The way the sun rakes across the landscape at a low angle creates a level of depth and drama that is simply unmatched.
Veggen: The Vertical Challenge
Veggen is the most demanding hike on this list, and I don't say that lightly. It’s a steep, sustained 90-minute grind that will test your lungs and your legs. But once you reach the summit, the view is incomparable—you have the entire western coastline laid out below you, with a bird's-eye perspective of Uttakleiv Beach and "the Eye" that no drone can fully replicate.
Timing and the Safety Reality Because of its steepness, Veggen is a location where you must respect the seasons.
The Sweet Spot: I highly recommend this for Autumn sunsets. The low sun hitting the coastline from this elevation is pure magic.
The No-Go Zones: In Spring, the melting snow makes the path dangerously slippery. In Winter, the slope is so steep that the avalanche risk is real and life-threatening. Stick to Summer or Autumn for this one.
Tactical Advice for the Climb:
Don't shoot after rain: The well-worn path from Uttakleiv becomes a vertical mud-slide when wet. If it has rained recently, save this hike for another day.
Starting Point: The trail begins directly at Uttakleiv. Look for the path ascending the ridge—it’s clear, but it doesn't let up until you're at the top.
Pro Gear: Proper hiking boots are non-negotiable. I also strongly recommend trekking poles—your knees will thank you on the way down, and they provide essential stability on the steepest sections.
Essential Gear for Lofoten Photography
Whatever season you visit, these are non-negotiable:
Lenses: prioritise wide-angle and ultra-wide-angle — the scale of Lofoten demands it. A 16–35mm or equivalent is your primary tool. A short telephoto (70–200) is useful for compressing layers of peaks and fjords.
Filters: a circular polariser cuts reflection and deepens the colour of the water dramatically — essential for the turquoise beaches. ND filters (6 and 10 stops) are critical for long-exposure seascapes and waterfall work.
Tripod: bring a solid one and make it tall enough. As noted at Hamnøy — a low tripod at a high railing is a problem you do not want to discover on location.
Weather protection: Lofoten weather changes fast. Waterproof jacket, waterproof trousers, and a dry bag for your camera gear are essential in any season.
Want to Go Deeper?
This guide covers the accessible locations. After 25 expeditions I have a second list — spots found through years of scouting that have never appeared in any photography guide, YouTube video or Instagram hashtag. I share them exclusively with expedition participants.
If you want to photograph Lofoten with someone who has spent a decade learning every ridge, beach and light window on this island, join one of our small-group expeditions.
Lofoten Midnight Sun Photo Expedition — June 18–26, 2026 Nine days of endless Arctic golden light. Turquoise beaches, red rorbuer, Midnight Sun from 22:00 to 03:00. Only 2 spots remaining. View full details and reserve your spot.
Lofoten Winter Aurora Photo Expedition — February 22 – March 2, 2027 Eight nights chasing Northern Lights, storm light, frozen beaches and Arctic drama. Now open for booking. View full details.
Max 6 photographers · 3 instructors · 25 sold-out expeditions since 2016
About the Author
Jan Smid is a world-renowned landscape photographer, Master QEP, and Official ZEISS Ambassador with over 300 international awards. Since 2016, Jan has led 25 professional photo expeditions to the Lofoten Islands, navigating every season and extreme Arctic condition imaginable. Known for his technical dominance and panoramic mastery, he helps photographers capture the extraordinary through elite Lofoten photo tours, online masterclasses, and private courses. Ready to master the Arctic light? Join Jan on his next expedition.
Pokud jste fotograf z ČR nebo SR a chcete fotografovat polární záři v profesionálních podmínkách, navštivte naše fotoexpedice — Lofoty, Skotsko i Aljaška nabízejí ideální podmínky pro focení polární záře, a to jak jako jednorázové záběry, tak jako panoramatické projekty.
Frequently Asked Questions
-
Both summer and winter offer extraordinary but completely different conditions. Summer brings the Midnight Sun — continuous golden light from late May through July. Winter brings aurora, snow, storm light and intense blue hours from November through March. Neither is objectively better; they produce fundamentally different portfolios.
-
No — but a drone opens up perspectives, particularly at Fredvang Bridges and above the western beaches, that are simply not accessible on foot. If you fly, Lofoten is one of the strongest drone destinations in Europe.
-
A minimum of seven to nine days allows you to cover the main islands and wait for good light at each location. Fewer than five days means accepting that weather will dictate what you miss.
-
Yes. The landscape elevates photography at every level. The technical challenges — wind, fast-changing light, long exposures — accelerate learning faster than almost any other destination.
-
Yes. We run small-group expeditions in June (Midnight Sun) and February (Winter Aurora). Maximum six participants, three instructors, fully adaptive itinerary. Details here.